
Our house was built with a formal dining room; one that we never used as such. We just aren’t formal dining people and so the room has been an unused space since we’ve lived here. Mainly, it’s been a catch-all. With it being right next to the front door, this has always been a little embarrassing to me, but we lived with it, until a few weeks ago.


One day I had an idea to turn this space into one we can actually use, which would be to make it into a sort of mudroom/office. We didn’t really have a great coat/backpack/shoe system, so I thought building something to accommodate all of this while the kids are still young would really help our family. And after I drew up my idea, it didn’t take long to get my husband on board. I have learned that drawing my ideas really helps me convey what I am thinking, and also gives my husband the visual to go off of.

Once I have a drawing, mapping it out with painter’s tape on the actual space allows us to see what it might look like and it helps get the measurements narrowed down.

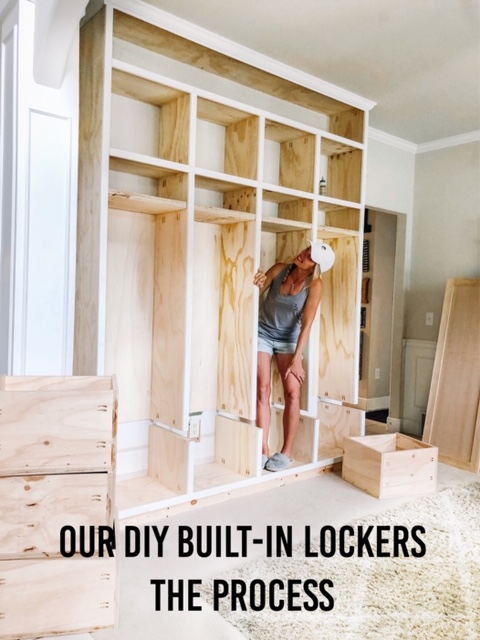
And then the building began! We first started by building the base. Our unit is seven feet wide and 18″ deep.

We then removed everything from the wall to make it flush, and we used an oscillating multitool do get the job done.

My husband then began building the frame of the unit while I went to Home Depot to get the butcherblock for the bench of the unit, as well as decide on what stain and sealant to use. I purchased the 8′ unfinished birch butcherblock and we cut it down to size.

Did you know that Home Depot will let you sample their stains? I brought in a piece of the unused butcherblock and they let me sample them on, which was so helpful. I ended up choosing Varathane’s Summer Oak, because I felt like it gave me the natural look I was going for without being too orange or yellow.

The actual frame of the unit went up pretty quickly, and after a few very precise cuts, the trim was up, too, but the boxes and doors took a little more time as measurements and cuts had to be exact. Plus, this was my husband’s very first time building drawers and doors! He put in the research and made sure to do them right.


I didn’t take many photos during these stages (sorry!!) but I did show what I could on Instagram, and I have saved those videos to my highlights HERE. Actually, I think I did a pretty good job of showing it all, so for more details, be sure to check everything out there under Mudroom 1, Mudroom 2, and Mudroom 3 on my profile page.

 Once the boxes and doors were built, we put the stained and sealed butcherblock into the unit, and then caulked the entire thing using a white paintable caulk.

After that, it was time to paint! To paint this quickly and as nicely as we could, we decided to use the same method as we did the last time we built THESE built-ins, and that is to create a painting room inside of our house and to use a spray gun. We like THIS one and have never had any problems with it. This prevented any overspray from wandering throughout the house and allowed us to get the smooth finish we were going for without any brush strokes.

TIP: We highly recommend you wear a painting suit, mask/respirator, goggles, and booties! Your clothes/hair/face will be covered otherwise.

NOTE: For this project, we used plywood because it is lighter and cheaper. We learned the hard way that you need a special primer to cover this kind of wood because it soaks up paint and doesn’t cover easily. The primer looked like it covered just fine, but when we put the actual color on it was left very cloudy and the wood grain was very visible. (Seen below.)
Primer

The primer we used was THIS and the paint we used was THIS. Had we used MDF, I think this combo would have been okay. Or, had we used a primer specifically for wood, I think we also would have been okay. So, just keep this all in mind! The next coat of green paint helped cover it up more, but it wasn’t perfect. So I then went over those cloudy areas with my roller, and that helped cover the rest of it.
Paint


A few more tidbits- look how much overspray would have been floating around had we not made a little room?
 If you get paint on the carpet, a Magic Eraser may get it out! I used one to get some paint off the wall, and since it worked on the wall I tried the carpet and it worked!


Because this unit is so tall, I wanted to fill the top portion with white books that have gold writing 9with the covers taken off) as I did in our living room. I liked the idea of them being tied together this way. (See below.)
TIP: You can find inexpensive books at thrift stores. When buying in this quantity, I try not to pay more than $1, and if I can, I buy the ones on sale (under $1).

TIP: The dollar store has white books with gold writing! (You can tell once the covers are removed.)

And I love the look they give! (Photo of the first built-ins we built.)

To see the reveal, go HERE!
As always, thank you for stopping by, friends!


I LOVE these!!!You are so talented! I learn so much from your posts!! Thank you for sharing!!! ❤️
This is such a beautifully done project! I’m wondering though, do you have a materials list so other DIYers could know what size/amount/type of lumber to get before they venture out?
Check cool pictures. You will love them https://www.gambarkeren.online/
Great cabinets! Love the look and especially of your Mastiff looking like they can’t wait for Dad to come off the ladder…
Do you still have the plans for this? Would you be able to share? I couldn’t find it on your highlight bubble on IG