
As I wrote about in THIS post, we decided to build built-ins on a complete whim. So much of a whim that I didn’t even get a chance to take any true before photos. (FAIL!) The two photos below are super old photos I happened to find that kind-of show the wall we wanted to build on, and the reason I don’t have ANY more photos of that wall is that it was so awkward! Since our main tv is a projector, I needed to leave that wall blank so that the picture wasn’t compromised by the decor, but that made for some awkward decorating.
So, my idea was to create some built-ins that would incorporate our projector tv, and when not in use, it could be hidden to look like a bench sitting area. Plus, with our ceilings being vaulted, I wanted something large to be on that wall to bring the room down a bit, making it feel cozier.


Before I knew it, we had moved the furniture out of the way to really get a feel for the space we were potentially working with.

Measurements were then taken, and my husband was really considering my idea. This is when he asked me to draw something up so that he could visualize what I was thinking.

This was my first draft:

And after a few more measurements, I deemed this my final draft:

I then had the idea to use painter’s tape to essentially “draw out” my design on the wall so we could really get a feel for the scale of it, and I could not recommend this step enough. This allowed me to play with how I wanted the shelves to look, the exact height and width we wanted, and to really visualize what it would look like in this room.


We spent about three hours planning this out, and then my husband went to Lowe’s and started rounding up some supplies we would need. I couldn’t believe it was happening so quickly! And the very next morning, my husband cut the carpet out and the project began! No going back now!

Building the base actually took a lot of thought and precise cutting, as we also had a vent to deal with. We also bought 12″ deep cabinets since they were in stock, (too impatient to special order anything) and we wanted our unit to be 18″ deep, so our plan was to leave a space behind the cabinets for cords and airflow for the vent and to redirect the air out the side.

Next, we built the shelving units using MDF. My husband researched which material would be best to use for this project, and he deemed this the best for the job.


An idea my husband had was to incorporate lighting, which I wasn’t so sure about at first. I didn’t want to be able to see it and was worried it would look cheesy, but oh my gosh! It doesn’t look cheesy at all and my husband was able to hide every single cord and tuck the lighting tape behind the trim.

Since my husband was doubling up the boards on either side of the shelves, he knew he could hide the cords in-between the two boards by cutting out notches for the cords to lay in.


And just like that, the cords were concealed!

And once the trim was put on the fronts of the shelves, the lights were concealed behind it, giving the shelves a nice glow. After that, we put some shiplap on the blank space in the middle to give it some texture (to see how we do shiplap, see the tutorial HERE).

We then made the bench cushion, which didn’t take long at ALL. To see that tutorial, go HERE.


Next, it was time to paint! Hand-painting this thing sounded awful. We knew it needed several coats, and with so many angles, corners, and heights that were hard to reach, we ultimately decided to paint it with a sprayer. This made me nervous as I know paint dust can get EVERYWHERE, so I suggested we create a painting “room.”

This would (hopefully) ensure that none of the paint could escape the room, and would also (hopefully) keep the smell down as well.

And friends, it worked like a CHARM. As in, not a single hiccup, and not a SINGLE paint dust particle escaped that room! This is totally the way to go if you decide to spray something inside your home. I went to Sherwin Williams and got their best primer and their best paint in the color “Snowbound.” And for our project, we did two coats of primer, and two coats of the paint, with a light sanding and wiping down between each coat.

For the lights, we just put a thin strip of tape over them so that they wouldn’t get painted, and that worked well.

When painting a large piece using a sprayer, we highly recommend you get a paint suit with booties and a hood, goggles, and a respirator mask! My husband was able to zip in and out of that thing with ease and wasn’t left with paint all over his clothes, hair or face.

One thing we didn’t think about initially was how the paint would adhere to the inside of the stock cabinets. And let me tell you, it doesn’t! And it looked awful. So, I went to Target and picked out THIS stick and peel wallpaper, and that fixed the problem right away! And I love the contrast it gives! Because I didn’t choose a wallpaper with a pattern, it didn’t take much effort to line it up, and we put it up pretty quickly. You can see how bad the paint was NOT sticking to the inside of the cabinets in this first photo, and how nicely is was covered up in the second.


To paint all of the doors, we set up a little area downstairs in our basement, and since the sprayer was pointing downward the whole time, there wasn’t much overspray. (You can see what we had in the photo below.)

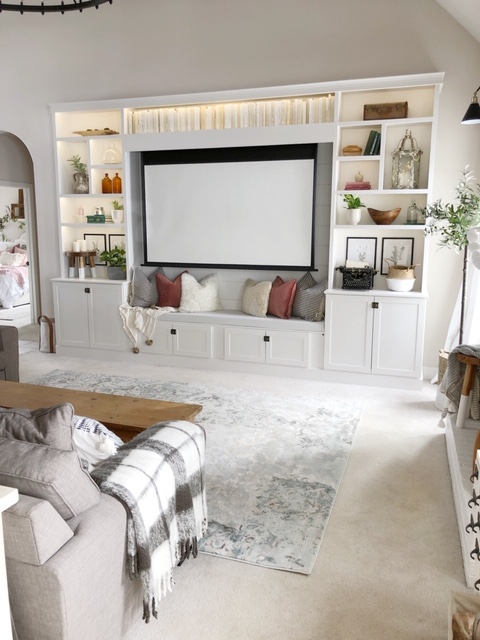
To hide the projector screen, we decided to hide it behind a board that would mimic the look of the shiplap. And we put the sound bar and receiver behind the screen tucked up on a little shelf. We really couldn’t come up with a better spot for it without having it be seen, and this ended up being the perfect solution. The sound isn’t muffled at all, and the receiver still works through the screen. And unless you are standing underneath it, you can’t see it! AND I LOVE THAT!

And since we had already had all of the equipment up there before painting, instead of taking it all down, we just taped it off, and hoped for the best! And not a speck of paint reached the equipment. I tell you, it was just all working out!

I wish you guys could have seen my face once our painting “room” was taken down! It all turned out so perfectly and I think we were both in a little bit of shock with how well that turned out!
The sconces are not hardwired. I mainly wanted them for decoration, but I did use Nesting with Grace’s magic light trick so that I am still able to get some light out of them with the click of a little remote. For the details on how I did that, go HERE.


And then, the REAL fun began! Styling! I mainly used things from around our home, but I did make a few trips to the thrift store down the street from my house where I bought all of the books that line the top shelf, the two amber bottles, and the little wicker basket.

Oh! And I did get a few new plants, and found that stool with the white legs at Homegoods.


In total, this project took 15 days from start to finish, which also include a few days in there that we didn’t work on it at all due to a busy week. I think that’s pretty dang good!


And there you have it! Our DIY built-ins and our best tips and tricks! I am beyond thrilled with how they turned out. Because the chairs are no longer there, it has really opened up the room and we have not only gained more walking space but have gained a huge new area to decorate and store things. A total win in my book!
Here are the links to a few sources!
Cabinets- Stock cabinets from Home Depot
If you have any questions, don’t hesitate to ask! I will do my best to answer! And as always, thank you for stopping by! And as always, thanks for stopping by!
<3 Shannon


It looks amazing!!!! I think I want, ok I NEED, the sources for those pillows!!! 😍😍😍 They look so good with the white built in.
Awsome!!! Great share. I am in the planning stage of building a similar unit. Your unit has given me some ideas and great tips. A few question:
1. Hiw tall is your unit?
2. From end to end, what is the width of your unit?
3. What is the width and depth of your niches?
4. If you are open to sharing, what would estimate your project cost to be?
Just started following you thanks to nesting with grace and the magic light trick — question about the the sconces you used and the type of shade. I just ordered similar ones, but they came with a clip on shade (so need a bulb) — just curious if you have encountered this issue and come up with a solution to get the shads to work with a puck light, or you would share your source for the sconces above.
Looking forward to following this blog.
Awesome job! Can you explain or show where your projector is? This would be a great option for our built ins, but I’m not sure it would work based on where you have to have a projector. Is it hidden on your couch wall somewhere?
Hi! I’m also interested in knowing how you dealt with the projector.
Hi! I’m also interested in knowing how you dealt with the projector.
I LOVE this project! Could you tell me a rough estimate on the total cost? Also, where did you purchase the cabinets?
Would you please provide the overall dimension of the built-in? Also the height and length of the wood seat? I want to build one exactly like yours! Much appreciated!
I am also curious how deep the book shelves are?
Loving that bench in the middle, this turned out so beautiful! I tried to get my hubby to tapes ours off to so I could envision the size but he refused. lol
Great look!
I am also wondering the depth of the bookshelves please?
You’re project is an inspiration!
Thanks!
I am thinking about doing this with my living room wall. I’ve been watching through my nebula since 2018. But I am curious, What did you guys do with the vent? I have one in the middle bottom of my wall as well
Did you purchase the bench or build it yourself?
Hey there. Was curious how You Guys did the little door cabinets under the screen. I read but didn’t see it. Thinking about doing something like this in Our Master bedroom. I like the look of what You Guys came up with very much. Hope to hear from You. GOD Bless You.
Hello !
It’s awesome and beautiful !!I love it !
I have a little question, how have you done the step to put the trim on the front of shelves to conceled the lights?
What have you use to do it ?
Many thanks in advance and for your beautiful idea !
Regards,
Dear Shannon,
i just love love love your bookshelf. is it possible to see where you are “hiding” the projecor?
Best regards from Germany 🙂
Lisa
I love this! But could you put more specifics on building them? How he made the bookcase part? How they are attached to the wall? Width of trim? Did he power nail everything together? Thanks!
I love this! But could you put more specifics on building them? How he made the bookcase part? How they are attached to the wall? Width of trim? Did he power nail everything together? Thanks!
What projector are you using? I get a nice amount of light in my living room and unsure what projector to use
I absolutely love this project! Im wondering how the projector works. it looks like it shines onto the screen from directly above the screen? But that cant be right? Can give me more info? Thanks
Hello! How high are your baseboards?
This looks great!! We have a very similar wall and layout and I am debating open shelves versus closed bookcases. I’m concerned of closed bookcases with the slanted ceiling and making the ceilings feel lower. Can you share a picture from farther back to show your whole room floor to ceiling?? And then would you mind sharing the dimensions of your unit?? Thank you in advance!!!
Hello! What an amazing job. I just have a question — In your photo #11, it shows the end of the cabinet, where there is an empty spot because the cabinets because they are only 12 inches deep — I might have missed it, but how did you cover the end of the cabinets (on the far left and far right sides of your whole unit). Thanks for any tips. It is just beautiful! I am excited to see your other projects.
Hi Shannon,
My wife loves this built in design!! I was wondering if you all had build plans for this?