When we moved into our house, there were some things I wanted to change as they were pretty outdated. One being our fireplace. I am not against red brick; in fact, certain types of red brick are making their way back, but ours was not the case. And that gold vent cover…
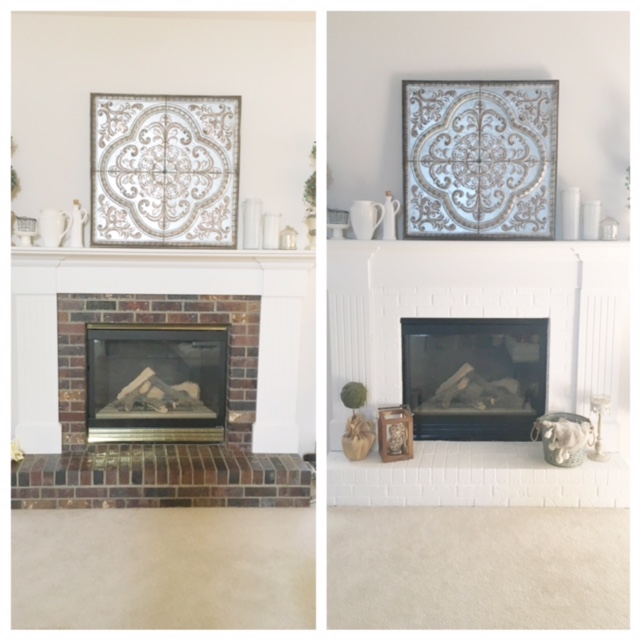
Before

With a little elbow grease…
After!

I’ll admit I was nervous to paint the brick, as once painted, there was no going back. But, it was a risk I was willing to take as it just did not go with the rest of the room.
Here is what I used…
Materials
–Painters tape (I used the blue kind)
-Dropcloth (mine was just that cheap roll of plastic kind)
–Roller brush in a smaller size and sponges
–Painting tray to pour the paint in
-Primer
-Paint of choice- for this project I used a little more than half of a half-gallon in Sherwin Williams’ “Snowbound”
-Spray Paint (optional) – if you want to get rid of the gold- I used Krylon High Heat Special Purpose black spray paint
And how I did it…
Directions:
I began by taping off the elements I didn’t want painted and laid down some dropcloth.

Because our brick had a sheen to it, I then sanded it down so that that paint would adhere better.

Then, I painted one coat of primer using this multi-purpose primer as suggested by the employee at Sherwin Williams. I used a small roller for this project which made the painting time minimal. Once the primer was dry, I then painted one coat of my top coat, which is Sherwin Williams’ “Snowbound.”

I used a small black sponge brush to get the small crevices and that worked well.
And about an hour later, I was done!

I then popped off the gold parts of the fireplace and spray painted them with the Krylon High Heat spray paint, which was much easier than I anticipated! I had no idea those pieces just came off and thought I would have to tape-off and hand-paint the pieces. But no, they just come right off! And once dry, I popped them back into place.

And I LOVE the final product! It took my husband about a day to get used to it as I didn’t exactly tell him I was doing this when I did it… he just came home to it complete. But, now he loves it, too. And someday, we won’t have white carpet anymore giving a greater contrast to the now white fireplace.

Before and after

What do you think? Is this something you would do?


Looks so good 🙂
ooooh, that’s gorgeous!! Great job! xoxo
Fine forum posts, Thank you!
What a great tutorial! I’m so lucky that our fireplace was painted when we bought our house, but if it wasn’t, I’d definitely be painting it.
Hi! I LOVE this fireplace! I am curious if you used gloss, semi-gloss, satin? Also, are you still happy with the sheen you chose?