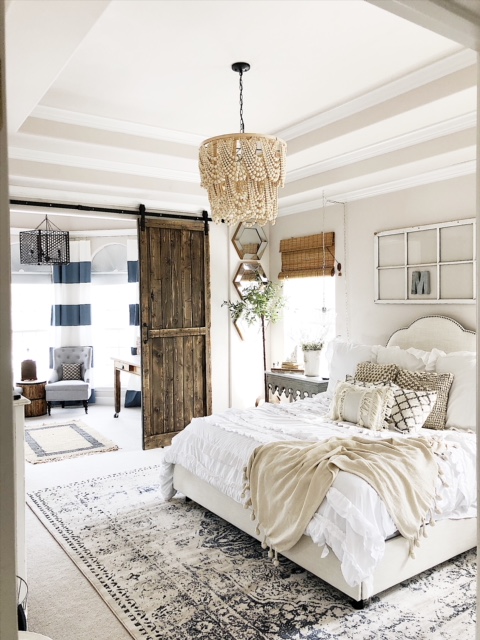
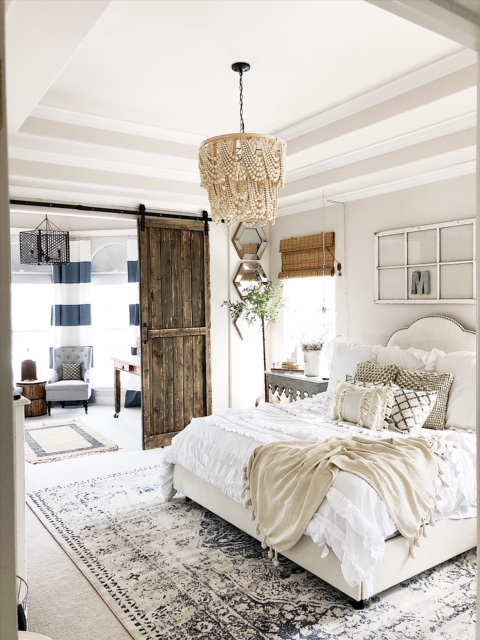
I’ve wanted a new chandelier for our bedroom for about four years now, but couldn’t find anything I really loved for our room. So, I was willing to wait until the perfect chandelier caught my eye. And about a month ago, I came across THIS chandelier from Pottery Barn and I knew I had found it. But the $800 price tag (not including tax or shipping) was enough to make me want to vomit, but I wasn’t completely discouraged. The more I studied it, the more I thought to myself… “I could make that!”
So, I set out to Pinterest to see if anyone before me had taken on this feat and to my surprise and total luck, someone had! And thank goodness, because figuring out the beading pattern would have taken forever, so extra high-fives to them for taking the time to do that!
So, first and foremost, you need to go to The House That Lars Built HERE to see the original tutorial on how to make this chandelier. Below is how I did it with the help of my husband and I have included little tricks I learned along the way to make things easier as well as the few things I needed to alter to make it work for me.
Materials
10 mm wooden beads 12 packages of 300
14 mm wooden beads 11 packages of 100
16 mm wooden beads 8 packages of 100
20 mm wooden beads 10 packages of 50
25 mm wooden beads 11 packages of 30
Sewing needle with large eye (so the twine can go through the hole)
Baker’s twine or cotton yarn in at least 400 feet
Scissors
Oscillating saw or small saw (to cut the embroidery hoops with)
Clamps (4-6 per hoop- you can always do one at a time, too.)
Two 1/4″ metal rods (I found these at Home Depot in the dowel section)
Black chain – I used about 18 inches, but take into account how much you will need.
If you want to add light:
Lightbulbs
Okay, let’s get to it!
Directions for Stringing beads:
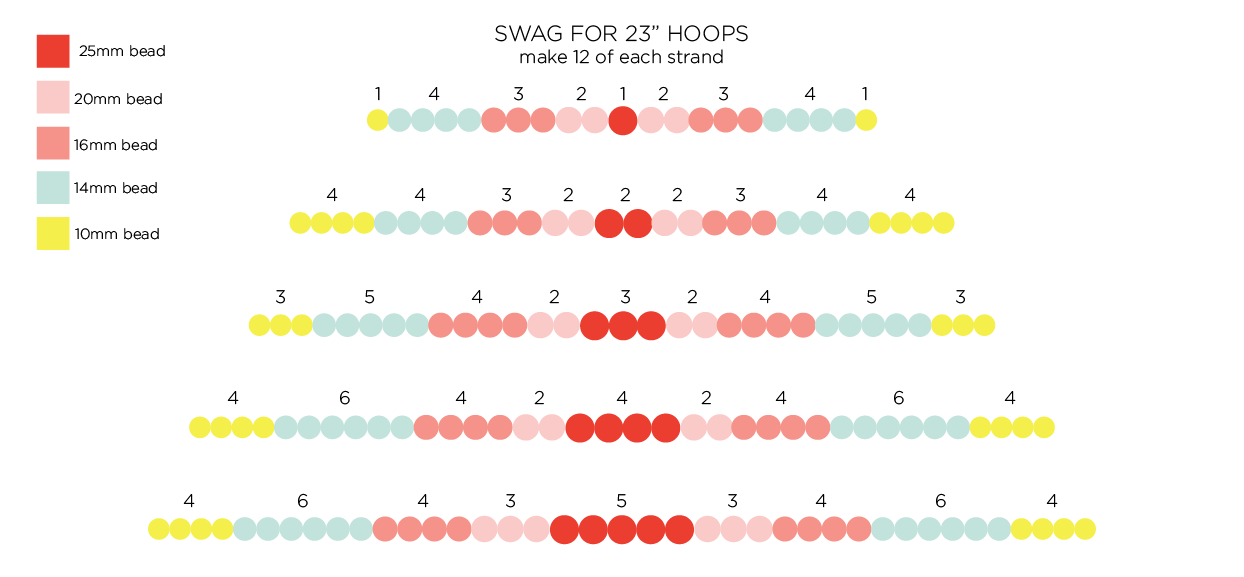
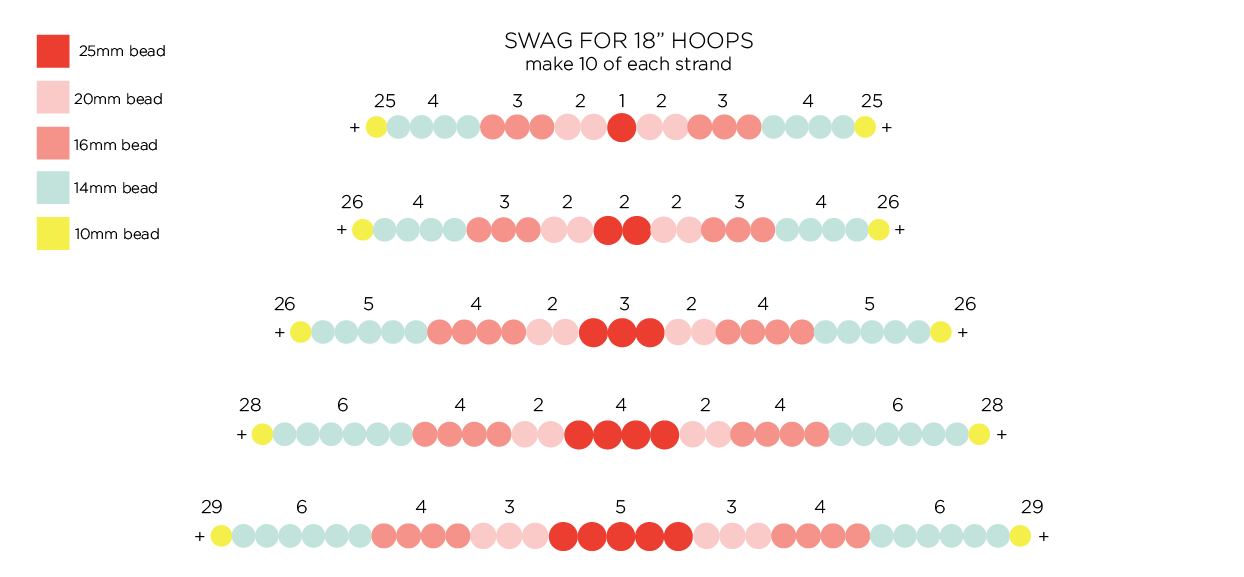
String the beads with your needle according to the diagram The House that Lars Built has created, also pictured below. Leave about 6″ of excess twine on each end so you can tie around the hoop.
Terms to know:
*One string of beads is called a Strand.
*Every U-shaped section of five strands (One in each size) is called a Swag.
Tips:
*I found putting the beads in separate bowls to be the easiest way of containing the beads. I also put them in the order that I would be stringing them to make it easier to keep track of.
*I found I could save some time if I put 2-3 of the smaller beads on the needle at a time before pulling them down.
*For easy storing and transporting, I recommend using hangers to tie the strands on until you are ready to tie onto the hoops.


Pattern for the 23″ Hoop
Pattern for 18″ Hoop:
*TIP- For my chandelier, I found 25 of the 10mm beads to be too many on the shortest strand, so I used 24. If I were to do it again, I would use 23 as this strand still turned out slightly long for me.
Directions for Tying the Strands:
- Separate your quilting hoops so that you have one closed hoop that does not open, and one open hoop that is adjustable (and has the clamp on the outside.) So in total, you should have four hoops in each size once you take them apart. Set aside one adjustable 18″ hoop and one adjustable 23″ hoop (the one with the clamp) as you will not need these. You will only be using two closed hoops and one open hoop for each size (18″ and 23″).
- Put your hangers of strands of beads close to you in the order you will be using them as it will make this step go faster. (Look below to see where I hung mine.)
3.Tie the strands of beads to one of the closed 23″ hoops with double knots, (use the photo below for reference) and tie them one swag at a time. (Again, a swag is 5 strands of beads, one in each size.) Make sure the knots are sitting on the top edge of the hoop (so that once you glue the hoops together, they glue flush to each other.) Start tying the strands for the next Swag close to the middle of the U-shape of your previous swag to form a crossover pattern until you have gone all the way around the hoop using all of your 12 Swags.
4. Repeat this process on one of the closed 18″ hoops with the longer strands of beads. This hoop will have 10 Swags total.


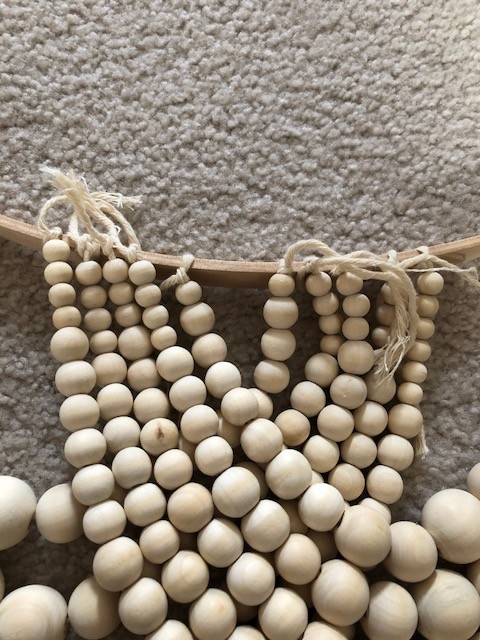
Directions for Glueing the Hoops Together:
- Take the tightening device off of the open, adjustable hoop. You should now be able to fit this open hoop around the outside of the beaded hoop (with a little gap since it will be slightly bigger). Essentially, you are sandwiching your hoop with the beads in the middle with the two other hoops in the same size.
- Use wood glue to secure this open hoop to the outside of the beaded hoop.
- Use a small saw (or some kind of electric cutting device like an oscillator) to cut the extra closed hoop. Place it inside the beaded hoop and mark where the hoop overlaps (which is how much you will cut off.) Remove that little piece of wood so that the two cut ends line up, and glue that hoop inside of the beaded hoop.
- Once you have the open hoop glued to the outside, and the closed hoop glued to the inside, place clamps around it to hold tightly for drying. We let it dry overnight.
- Once completely dry, cut off the excess twine.
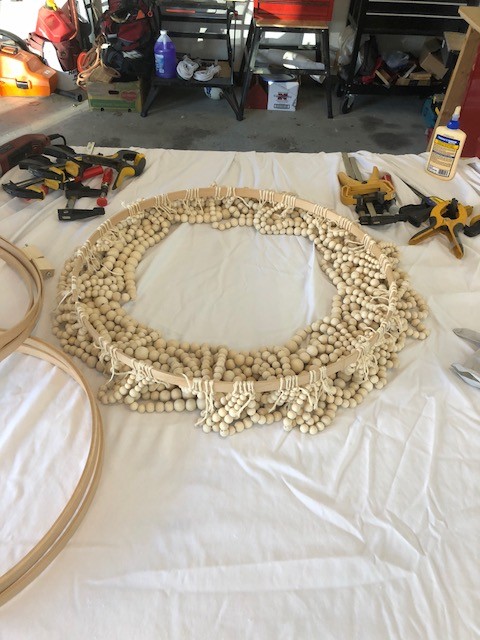
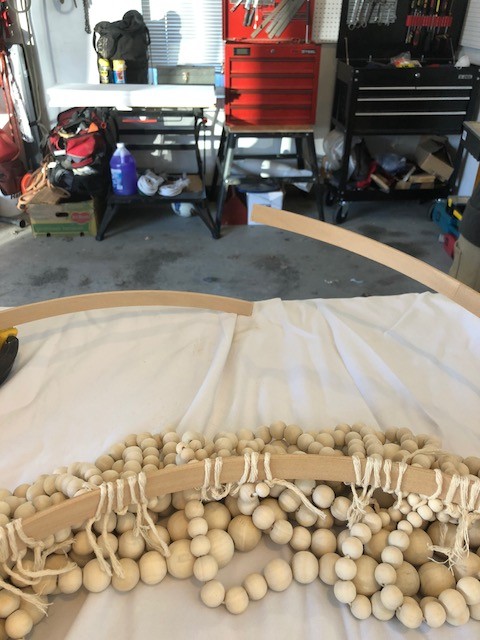
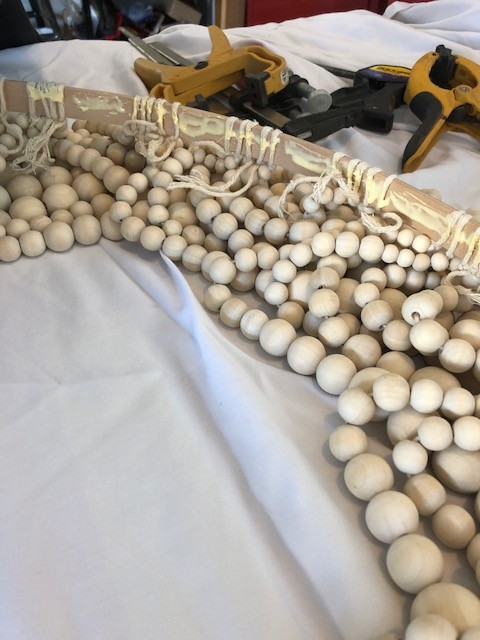
TIP- We put a little more of the wood glue along the strings on top of the hoops to help secure the strings from falling through.
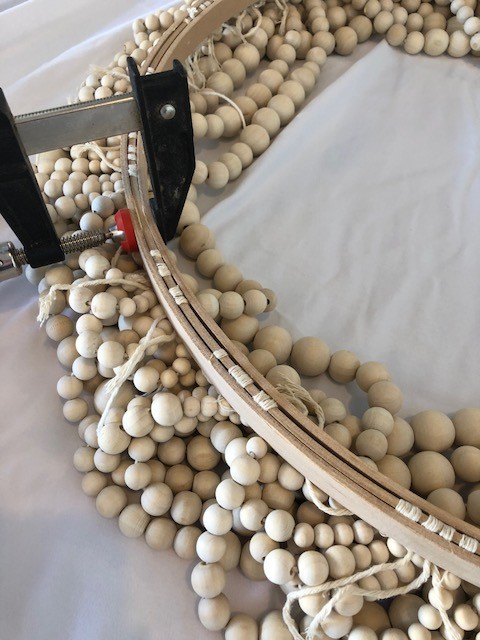
Directions for Installing the Rods
- Place your rods across the hoops in the shape of an X and measure to make sure they line up evenly and mark the spots where you will need to drill. Drill 4 holes that go all the way through the inner hoop, but only drill about halfway through the outer hoop.
- Cut the rods down to size (about 1/4″ shy of the diameter of the biggest hoop)
- Once the holes are all drilled, put the rods through the smaller hoop and fit it tightly into the larger hoop. The rods will overlap each other and since they are so thin, they will bend slightly so that you are able to maneuver them how you would like to in order to get them in the holes.

Directions for Hanging the Chandelier and Installing the Light
First, my husband removed the current light fixture and discarded the glass portion of it while keeping the part with the light bulbs and wires. He then took the pendant lighting kit and cut off the bottom portion where the single bulb was and replaced it with our old lighting fixture which holds three bulbs (We wanted more light). Next, we took 18 inches of black chain and connected one end to the center of the rods andthen threaded the black wire up the black chain toward the ceiling. We then connected the chandelier to the ceiling by using a Ceiling Switch Plate and hung the other end of the chain from the hook on the ceiling plate.
Because it wouldn’t hang perfectly straight, my husband used a black zip tie to cinch it up straight, which can’t be seen.

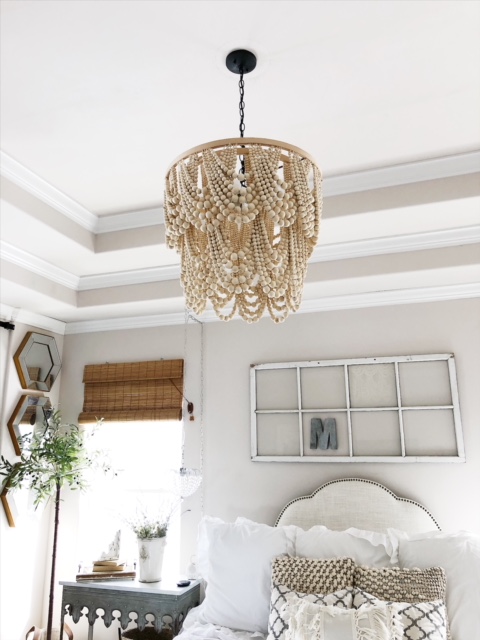
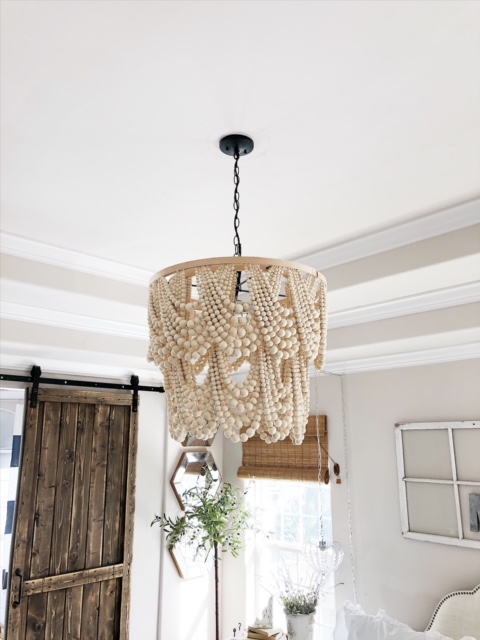
And with the light on:
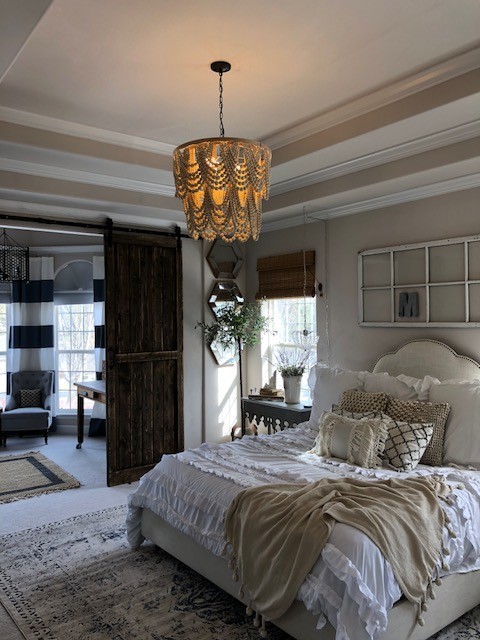
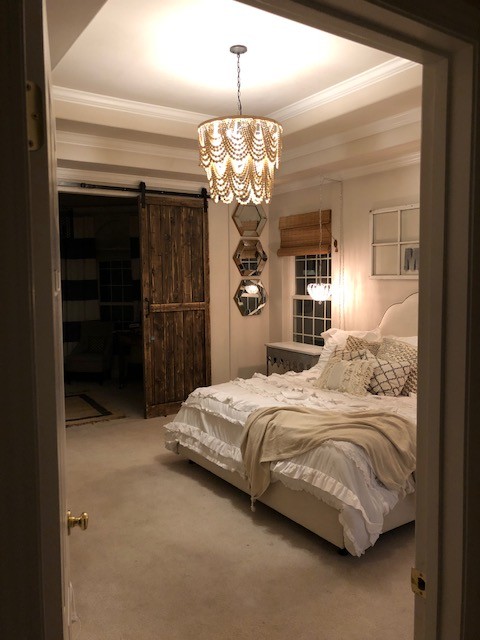
And that is IT! I say that lightly, as truly this thing is a lot of work. BUT! I did complete it in about five days. I was so determined to bust this thing out and I did. Get yourself a Netflix show and whenever you can, string away. I saved about $800 by making this chandelier myself. The total cost of the Pottery Barn Chandelier is $956. 24. The total cost in making this one was under $200, and I was able to use a $100 gift card on the parts. So, I really paid about $100 for it.
And I am telling you, it was WORTH it! It’s been hung for about a two weeks now and I am still so obsessed with it. If you want to make this yourself and have any questions, don’t hesitate to ask! I will do my best in helping you out.
A huge thank you to The House That Lars Built for the original tutorial. I wouldn’t have been able to do it nearly as easy without it!
Thanks for stopping by!




This is absolutely incredible!
Thank you, Neely! I am so happy with it!
This chandelier came out AMAZING! I think I’m going to build my own as well
I encourage you to go for it! Let me know if you have any questions!
This is so stunning! How much did you spend on supplies?
Correction, where did you get all of your beads from? I looked on Amazon and it’s a bit pricey for all that are required.
Thank you!
Did she answer this? I am wondering the same
OMG, you did an amazing job! It looks beautiful. Definitely be proud of yourself! And I love your bedroom barn door (I really need to find a place to put one in my house).
Thank you so very much! I appreciate the pat on the back! And yes, barn doors add so much character!
WOW! first of thank you for sharing all these tips to make the chandelier. Yours came out amazing! :))
Thank you so very much! No need to pay an arm and a leg for the original!
Oh wow, it looks amazing. That’s awesome you saved so much by making it yourself too. Thanks for all the extra tips here.
You are so very welcome! I am thrilled with it!
Omg this is stunning!!
EEEEEEK thank you!!!
THIS IS AMAZING!!!
Sure it takes some work, but what a cost saving and also what a great sense of satisfaction every time you switch on the light.
YOu nailed it! I am so willing to put in some effort with a payoff like this!
Wow, that turned out just gorgeous! I love DIY projects!
I am with you! Love a good DIY! Thank you!
I love a great DIY success story! It really does look just perfect in your bedroom!
-Jennifer
https://maunelegacy.com
Thank you so very much! I appreciate the kind words!
This is beautiful!
Thank you, thank you!!!

Wow, I cannot believe you DIYed this! It looks amazing. We just bought our first house, so I’m definitely book marking!
It’s definitely doable!! Thank you!! I appreciate the excitement!
I totally want to attempt to make this!! Thanks for all the tips!! Do you mind if I ask how much you spent in total?
Such a big effort but its worth it when you see the results! I love your patiente and hard work to do it
YES! So worth it in the end! Thank you!!
Wow! I prefer yours to the mega expensive one. I wish I had the time and patience to do this as the results are stunning.
Thank you so much!! If you’ve got any extra time in the evenings you could chip away at it!
I cannot believe you made this!! It’s incredible!! I want to do this now! And I absolutely love your home decor! It’s beautiful!
AHHHH THANK YOU SO MUCH!! You NEED to make one! It’s not hard, just time-consuming!!
Wow!!! This is amazing!!! I totally want to make one for my house!! And your room is beautiful!!
Okay you need to do it! You CAN do it!! And thank you so very much!!
I sometimes wish I was a DIY-er because you’d totally save SO MUCH money on something that looks just as amazing!
It’s not for everyone, but man! You are right! You CAN save so much!! Thank you!!
OBSESSED!!! I can’t believe that you made this. You could sell these for so much money.
xoxo,
Angelle
http://www.dashingdarlin.com
Your site has surely furnished me personally with simply the information that I just required.
We have recently been doing exploration about this subject for
a while, and this seems to have taken a long while to discover a weblog that gives all the details
that I require. We search toward reading even more blogs authored by you in the
future, and should look here initially the very next time I currently have a fact-finding mission. http://at-home-massage-nj.njmassage.info/at-home-massage/category/at-home-massage-articles/
I know I’m super late to post this but thank you so much for sharing the tips and like separating the beads on hangers and so on. We are buying our first home and totally gonna try this thanks to you! Can I ask where you got the beads and material from? You probably mentioned it somewhere but I couldn’t find it so if you already said this I’m sorry.
I love this so much and am in the middle of making it! How did you get the attachment off the quilting hoop? I’m stuck on this part! Thank you for sharing this awesome tutorial!
How did you cut the metal rods? I’m so close to finishing this beautiful project but stuck on this step! Thank you for sharing this!!
So over all…..do you know the total cost or was to make? It’s amazing
So over all…..do you know the total cost or was to make? It’s amazing
Gorgeous!!! Where do I get the beads from? Any wholesale?
I want to make this! And I totally trust that I can but the part that i dont understand is how the actual light cord and bulb fit in the middle? Picture? Thanks and good job:):):)
It’s amazing!!!!
I’m in the midst of gathering materials to make this chandelier. I originally saw one like it on Anthropologie. Theirs is dyed a blue ombré, and has a hefty price tag of $1200. I am struggling to find all the beads at a decent cost as I need them shipped to Canada. Just wondering if you had any suggestions. Also, I may attempt to dip dye mine. I haven’t fully decided yet…
Thank you. I just now started following and I can’t believe what great diys you have for your followers. I love doing diys and have been doing them since I was a little girl. Actually way before diys were diys. I made the things I wanted but didn’t have. So excited I to start the beaded lamp.
This is just incredible! You are one amazing girl!
FYI, the original person who made this DIY that you are using some imagery from is charing $5 to buy the guide so not sure if you want to keep this post up?
Omg!!!! I love this I just ordered the beads thank you for making it so easy to follow much respect!!
hello! where did your order the beads from? I can’t seem to find a suitable cite with decent prices. Would appreciate some feedback!
I am having the same issue and it looks like she has never answered anyone’s question (unless I cant see it for some reason).
Have you found where to purchase?I have found several websites with low pricing but I am afraid they are not legitimate sites.
Actually she did address both of these questions in her article and the links within her article.
That was helpful….
This is fabulous!! How did you cut the rods though?
Where did you purchase your beads if you don’t mind me asking. I cant find them that will allow me to be any where near under $200
Thank you so much for the tutorial.
I am having the same issue and it looks like she has never answered anyone’s question (unless I cant see it for some reason).
Have you found where to purchase?I have found several websites with low pricing but I am afraid they are not legitimate sites.
This is Beautiful! I’m going to attempt it! I also want more light and want to use more bulbs.. can you send me a picture of the bulbs and how you did that ? thank you for sharing this !
I love this so much, any suggestions on how to make a smaller version?
Forgive me if I missed it but where did you buy your beads. I have looked everywhere and can’t check out without it being over $300 just for the beads.
As stated in the link she provided, Amazon. I just purchased my beads there for $189.
Curious…Where did you find your beads? If I try ordering just the beads alone, I’m already at a cost of $450+, which is way higher than your all in 200 bucks.
Thanks!!!
Where did you get the beads from?
I am following your instructions to which are perfectly laid out and easy to follow! I have one question though, where did you purchase your beads? Everything I am finding is expensive and nearing $200 total
Hi Thank you so much for sharing your beautiful light. I am in the process of starting to make my own but cannot find Quilting hoops that are 23″ and 18″. I look on Amazon but they don’t have that size. Do you have any suggestions? Also, I am located in Australia
Thank you
Sharon
Hi!
I love this, you did an AWESOME job. I am attempting my own now but I would like to make mine a little smaller with an 18″ hoop and a 14″ hoop. Could you help me with the strand/swag patterns? How did you calculate this out?
Thanks in advance!!
I have no idea if you still respond to this post, but do you happen to know about how much this chandelier weighs?
Hi! I’ve been trying out your DIY but I can’t find cheap beads online… where did you get yours??!
This is amazing and exactly what I want. Could you do a video tutorial?
So breathtaking. This is my DREAM light fixture. I love it when people do some top quality DIY’s and share it. Well Done!
This is freaking AMAZING!!!!!! Can I pay you to make me one? It’s awesome.
Where you stated that ” next time you would use only 23 of the 10mm beads”because it was too long, I couldn’t figure out exactly what you meant. I can see the length and I agree though exquisite I would prefer the bottom swags to be shorter. But I couldn’t figure out how to use only 23 10mm beads . Doesn’t the swag need an even amount of 10mm beads ?
I love this! I’m getting the supplies this weekend. Can you explain to me the mounting process a little more though? I think I’m confused on how it actually can be hung. Which items should I get to do that? We have an old boob light now! lol
Can you tell me where you purchased your wooden beads?
Thank you!!
Lisa
Hola, hermosa tu lámpara!! Me podrias mandar el enlace al tutorial, te lo agradecería, un saludo!! Y te felicito, desde ya muchas gracias!!
Hello, when you say 12 packages of 300… Do you mean 300 beads in one package times 12. Or 300 beads total.
Fabulous! Thank you for putting this wonderful beaded chandelier within the reach ($) of many. Thank you for sharing!
Just bought all the things and looking forward to creating this! Thanks for posting this tutorial! I have been eyeing this chandelier for about a year, but there was no way I was going to pay $800! <3
Can you give me an idea of a really good place to buy the beads. I live in Canada and I’ve been looking at Ally express not sure if you’ve used them before? To make this affordable. Thanks for your info
Hello! where can I buy the rods that you are using?
Nossa!!!!! Ficou lindo. Obrigada pois é meu desejo também.