
A while back I blogged what I would like our baby’s room to look like if we had a boy and what I would like it to look like if we had a girl. (See that post HERE) Well, we had a boy! So a rustic woodland theme it is!
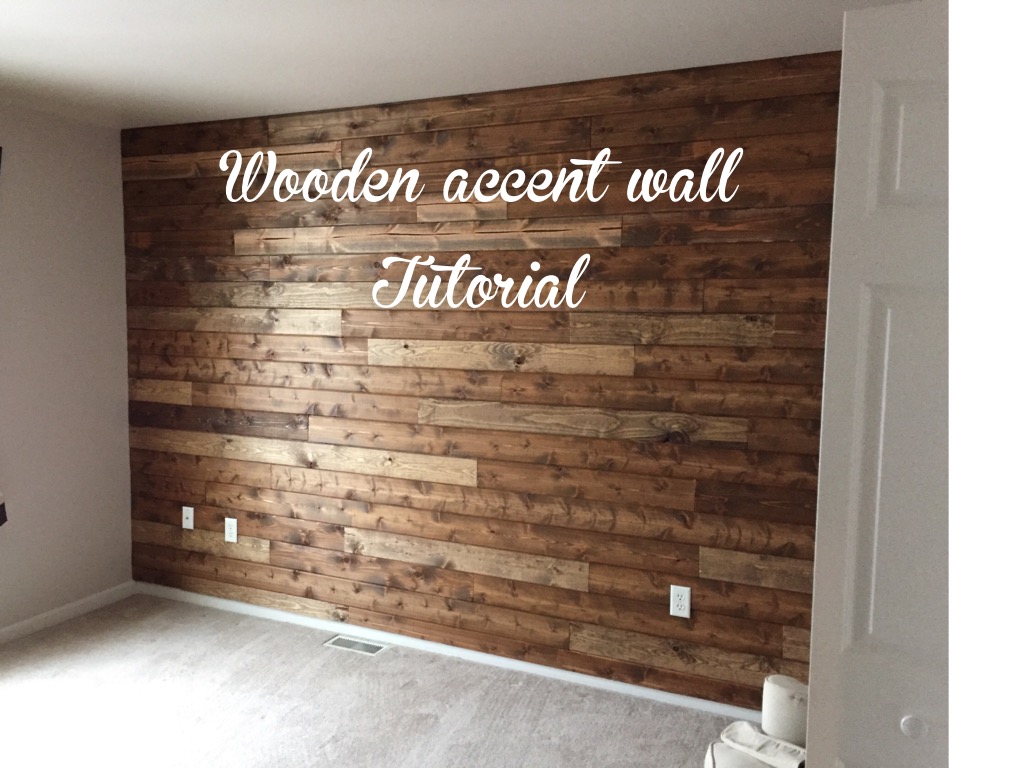
And to kick off the decorating in this room, The Hubby built this wooden accent wall that has me all sorts of excited. It’s EXACTLY how I had envisioned. Actually, it’s better.
Materials:
21 8′ cedar tongue and groove 6″ width boards
5 12′ pne tongue and groove 6″ width boards
9 8′ 3×1 boards
2″ long 18 gauge pin nails
Wood stain (We used Special Walnut)
Carpenter triangle (or something else to ensure straight edges)
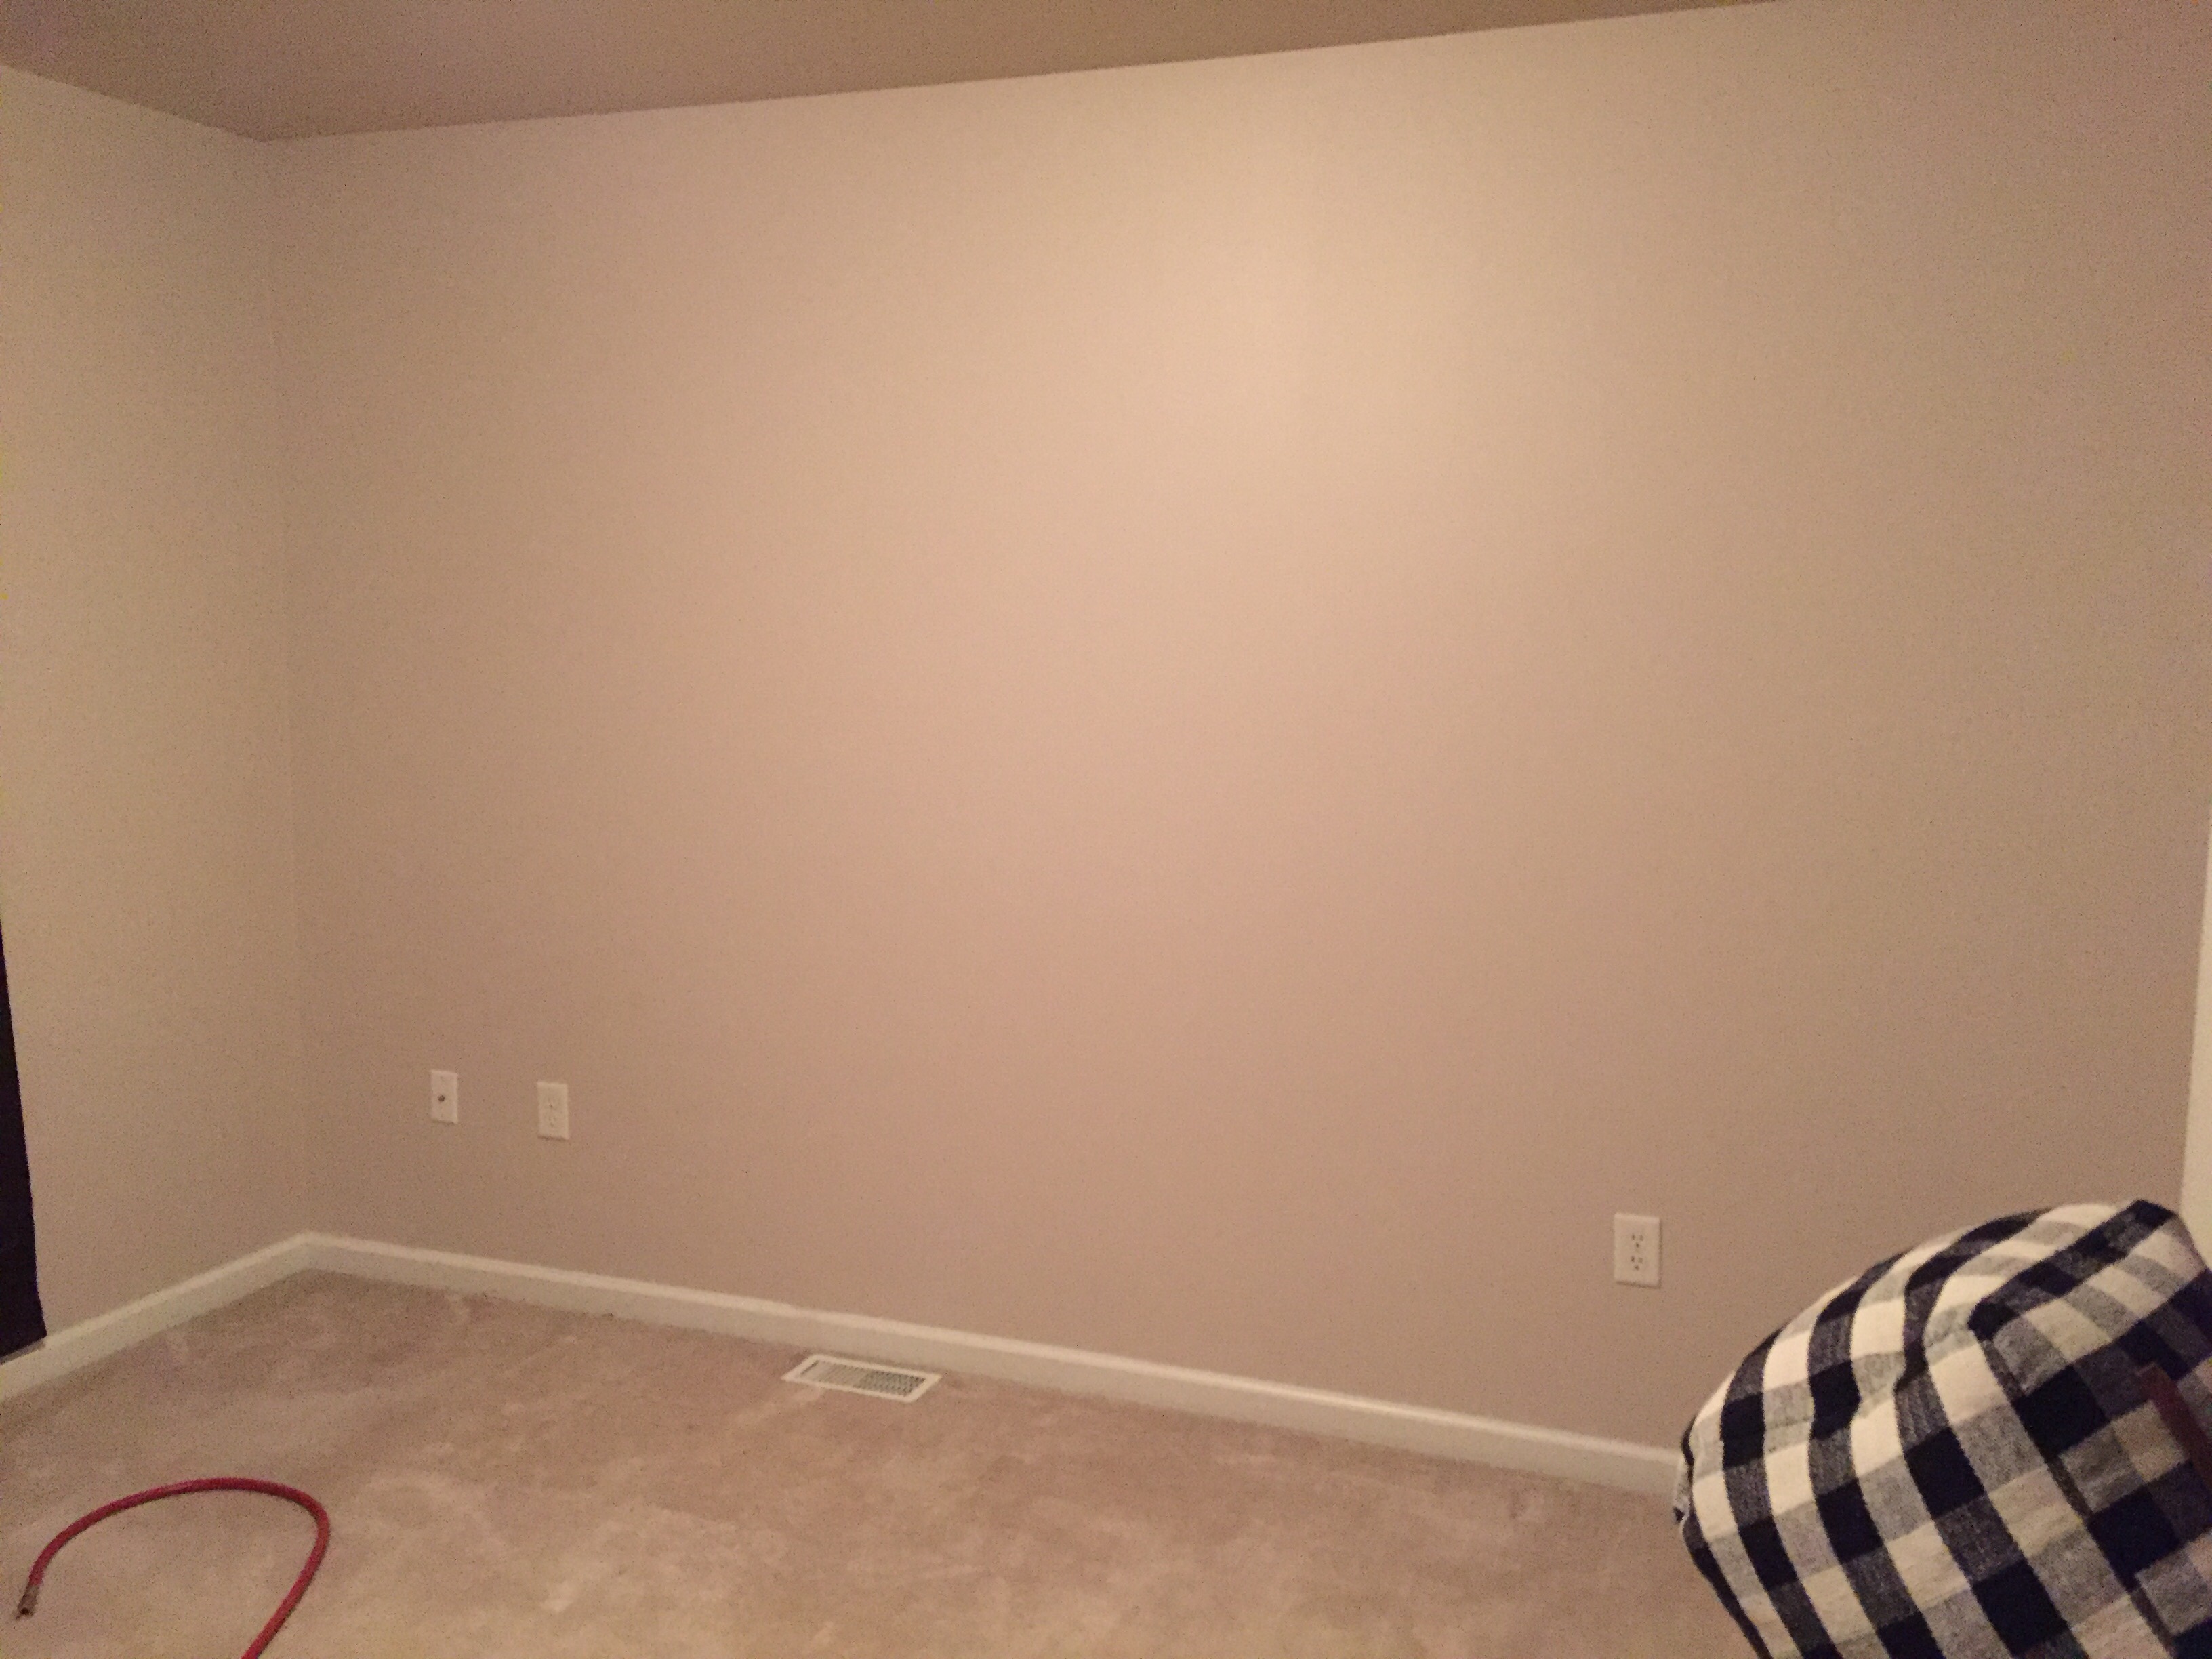
Here is how we did it.
First, we went to Lowes and chose our wood. We decided on a mix of cedar and pine boards, getting twenty-one 8′ cedar tongue and groove 6″ width boards and five 12′ pine tongue and groove 6″ boards.
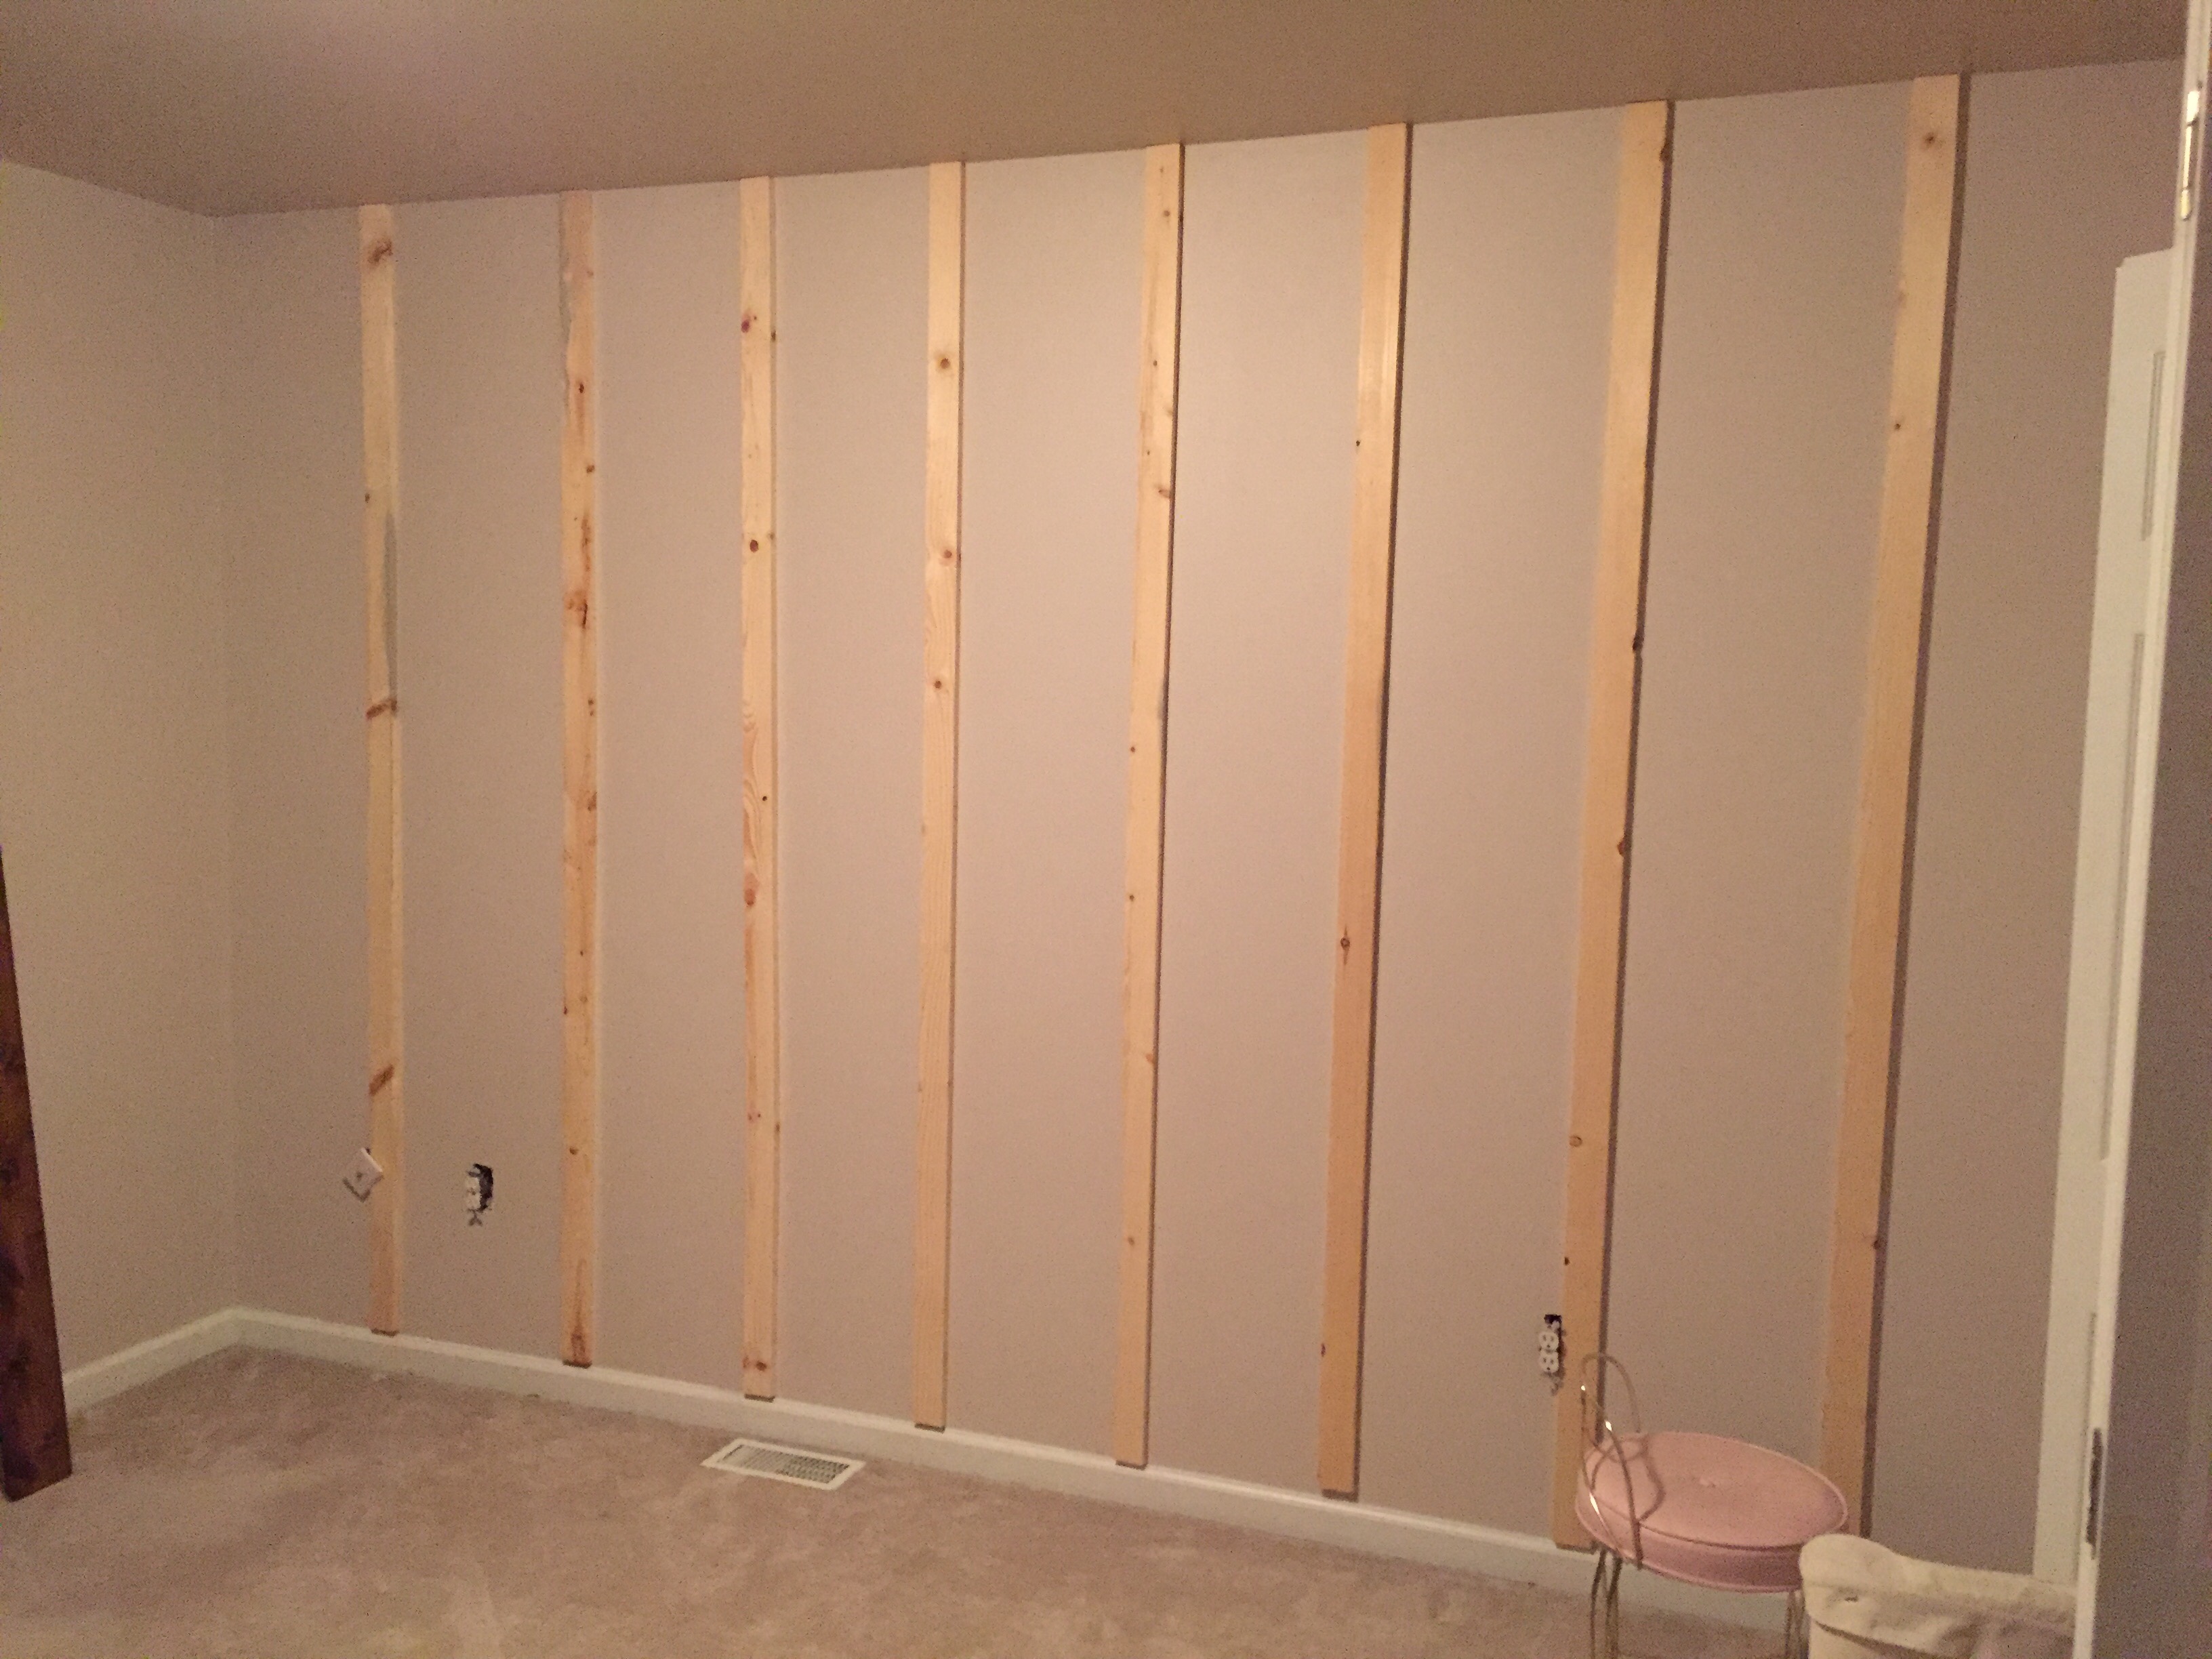
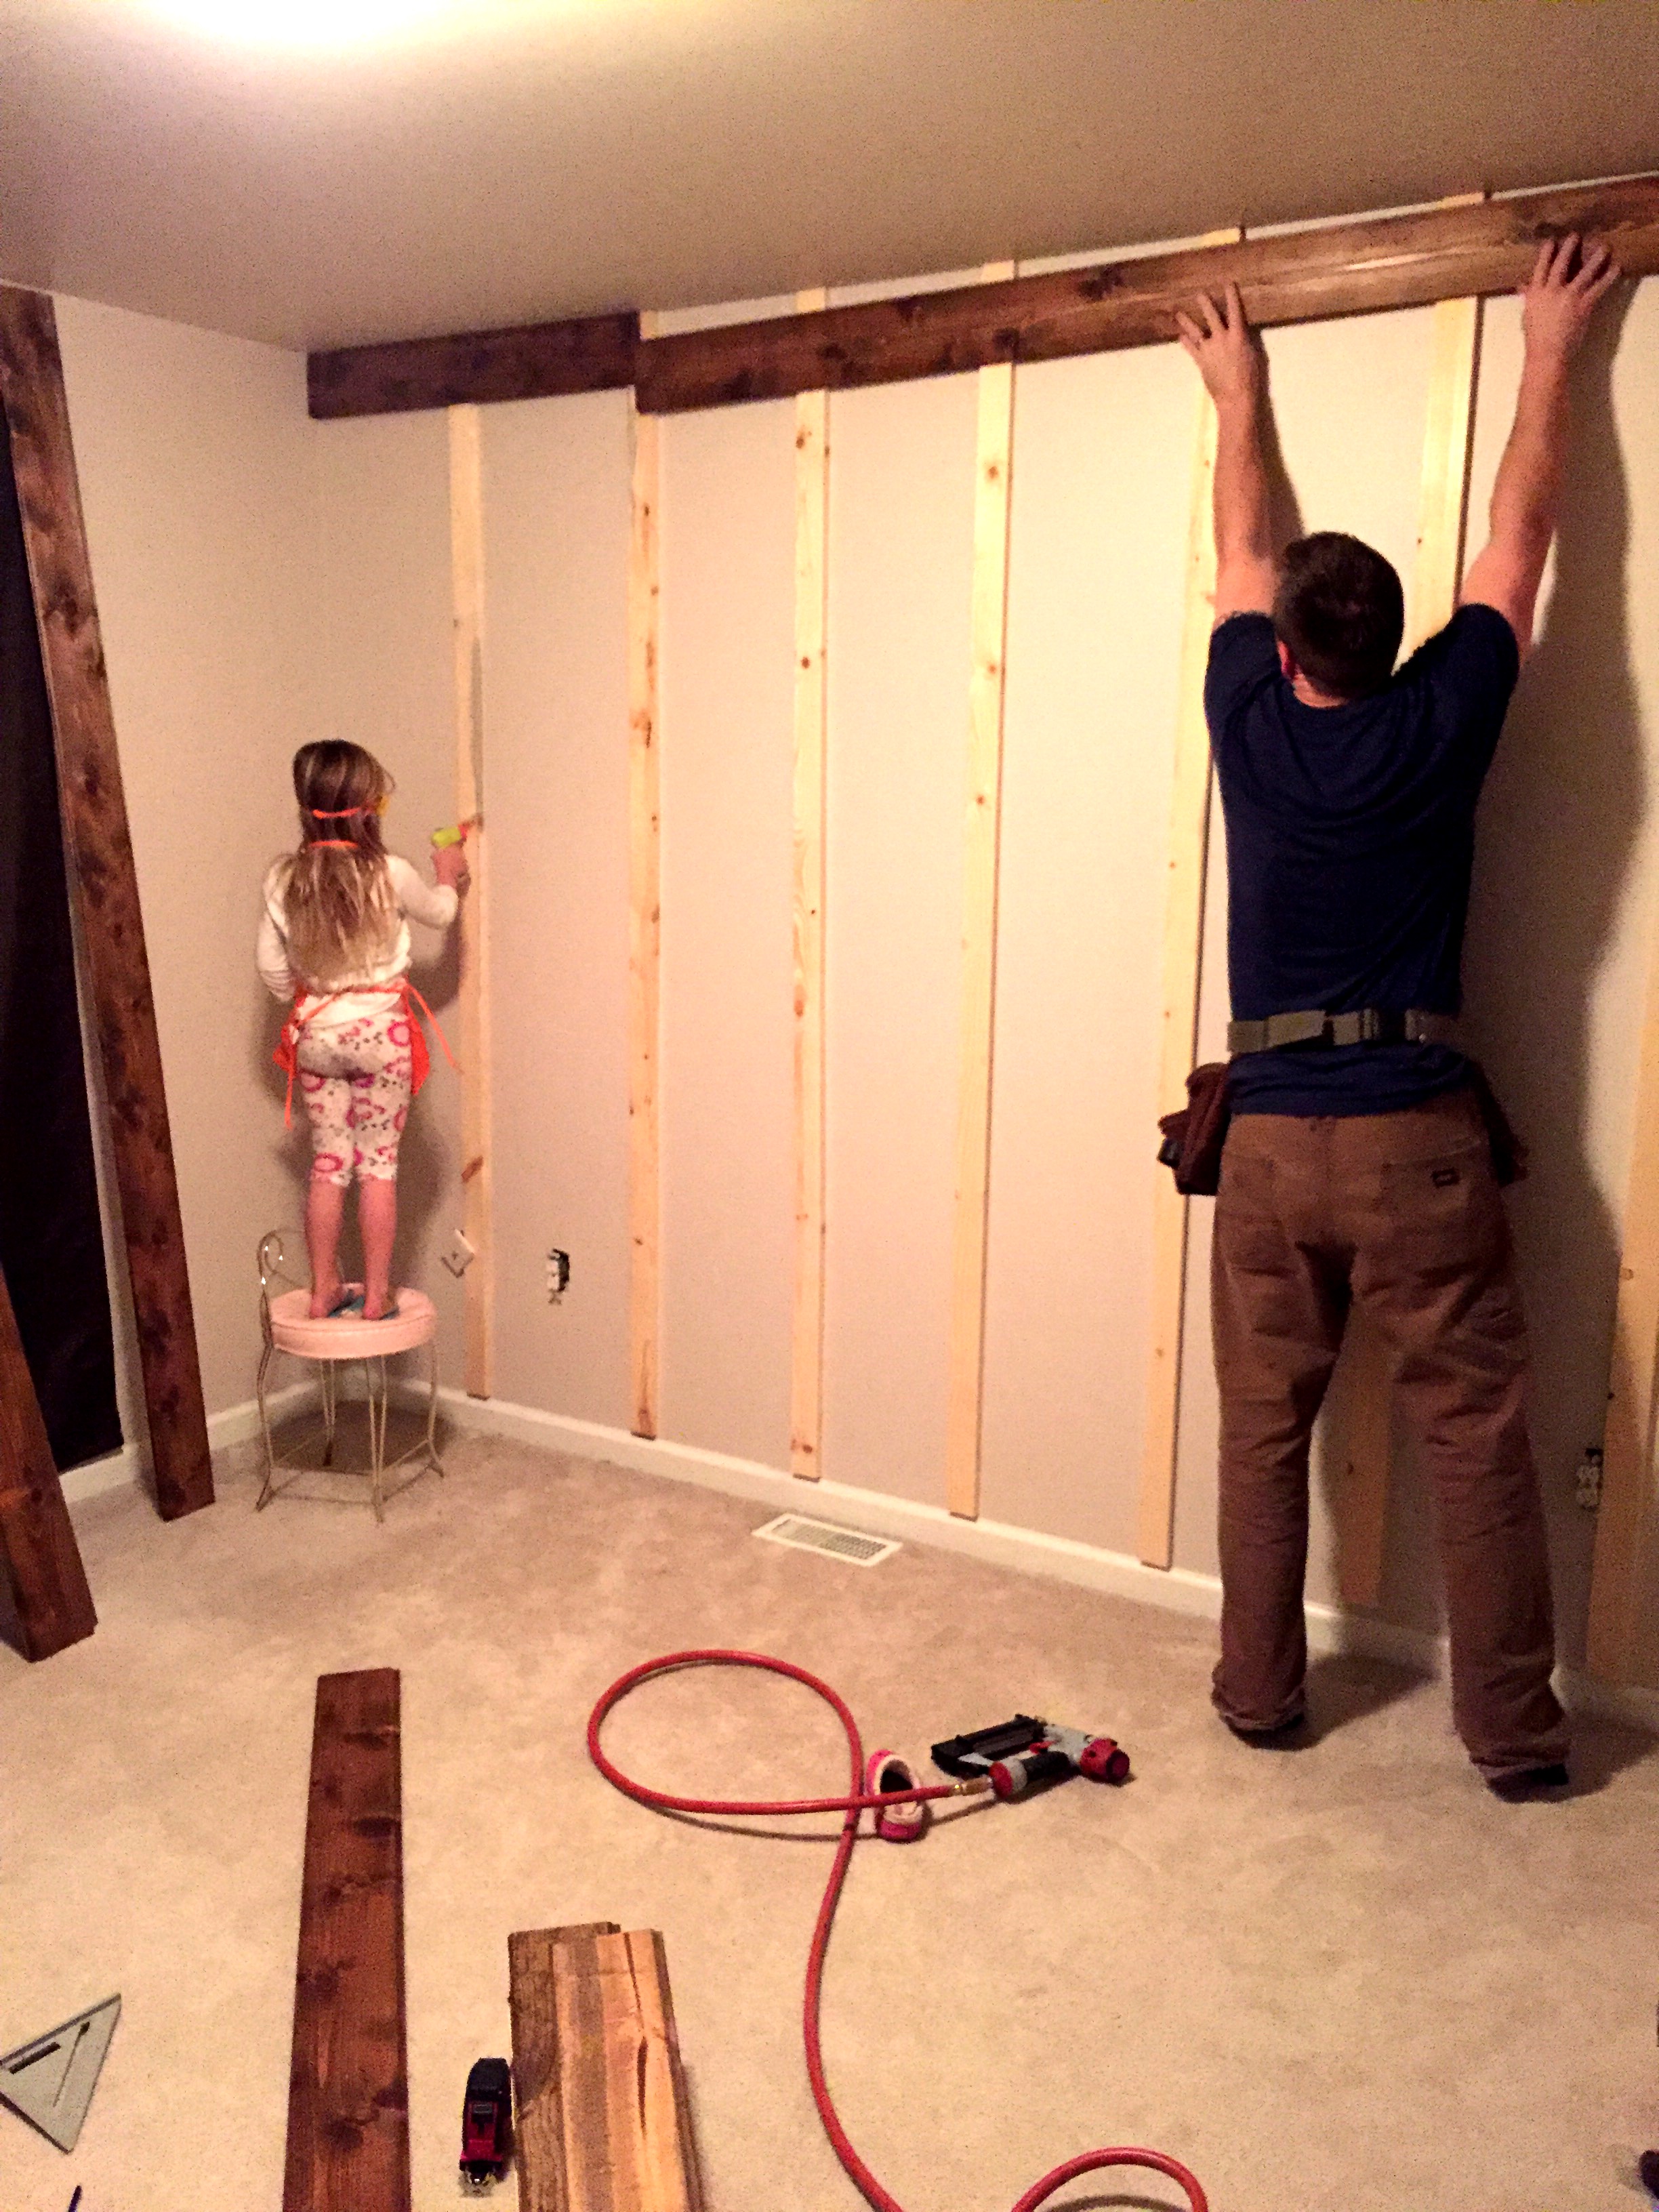
We also got nine 8′ 3×1 boards that were pin nailed (using 2″ long 18 gauge) to the studs over the dry wall so that if we happen to change the room down the road, we aren’t ripping the wood from the actual wall which would result in us having to re-do the dry wall.
We decided on Special Walnut as our stain, and since we chose two different kinds of wood, we knew it would vary the shade of color as well. My husband stained all of these in our garage, and while drying put the 3×1 boards up.
He then brought up a few boards at a time and started piecing them together, making sure to pay attention to which colors were being put next to each other. He cut them in varying lengths to give it that old rustic barn wood look using a cordless skill saw, and he made sure his cuts were straight by using a carpenter triangle.
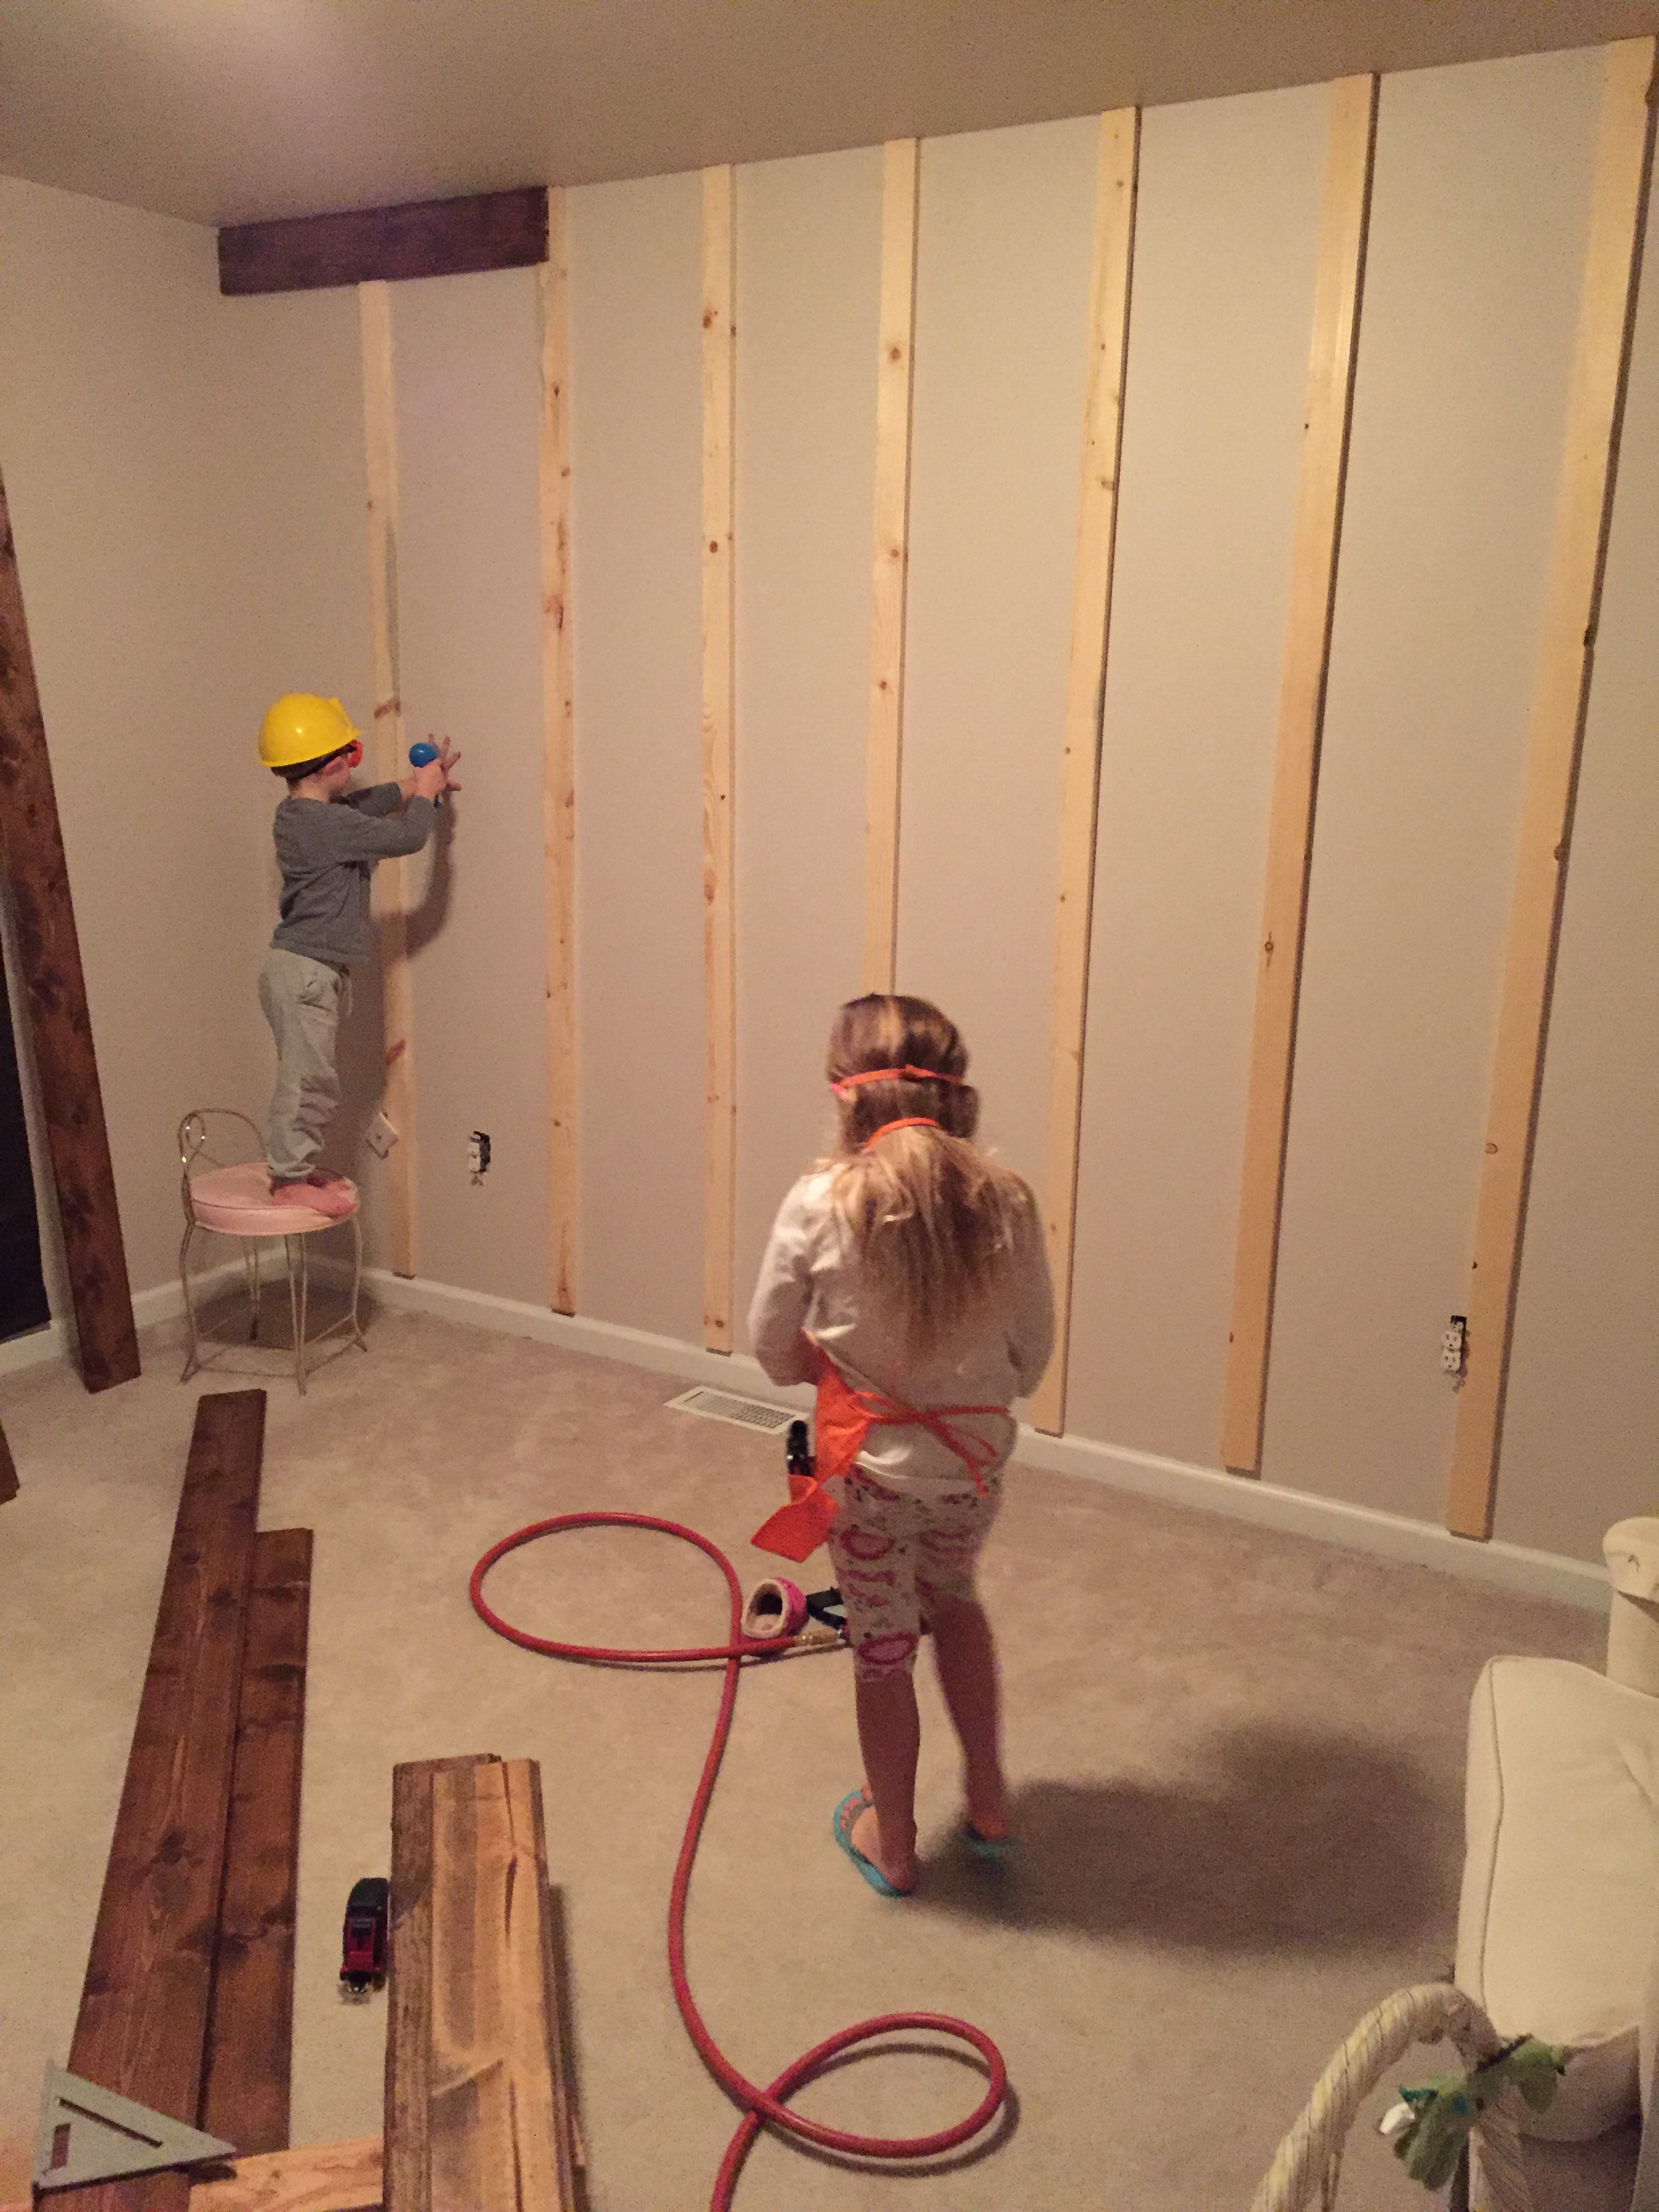
And don’t think he did this alone! Two little helpers were more than willing to lend a helping hand.
Once the boards started going up, it actually went pretty quickly.
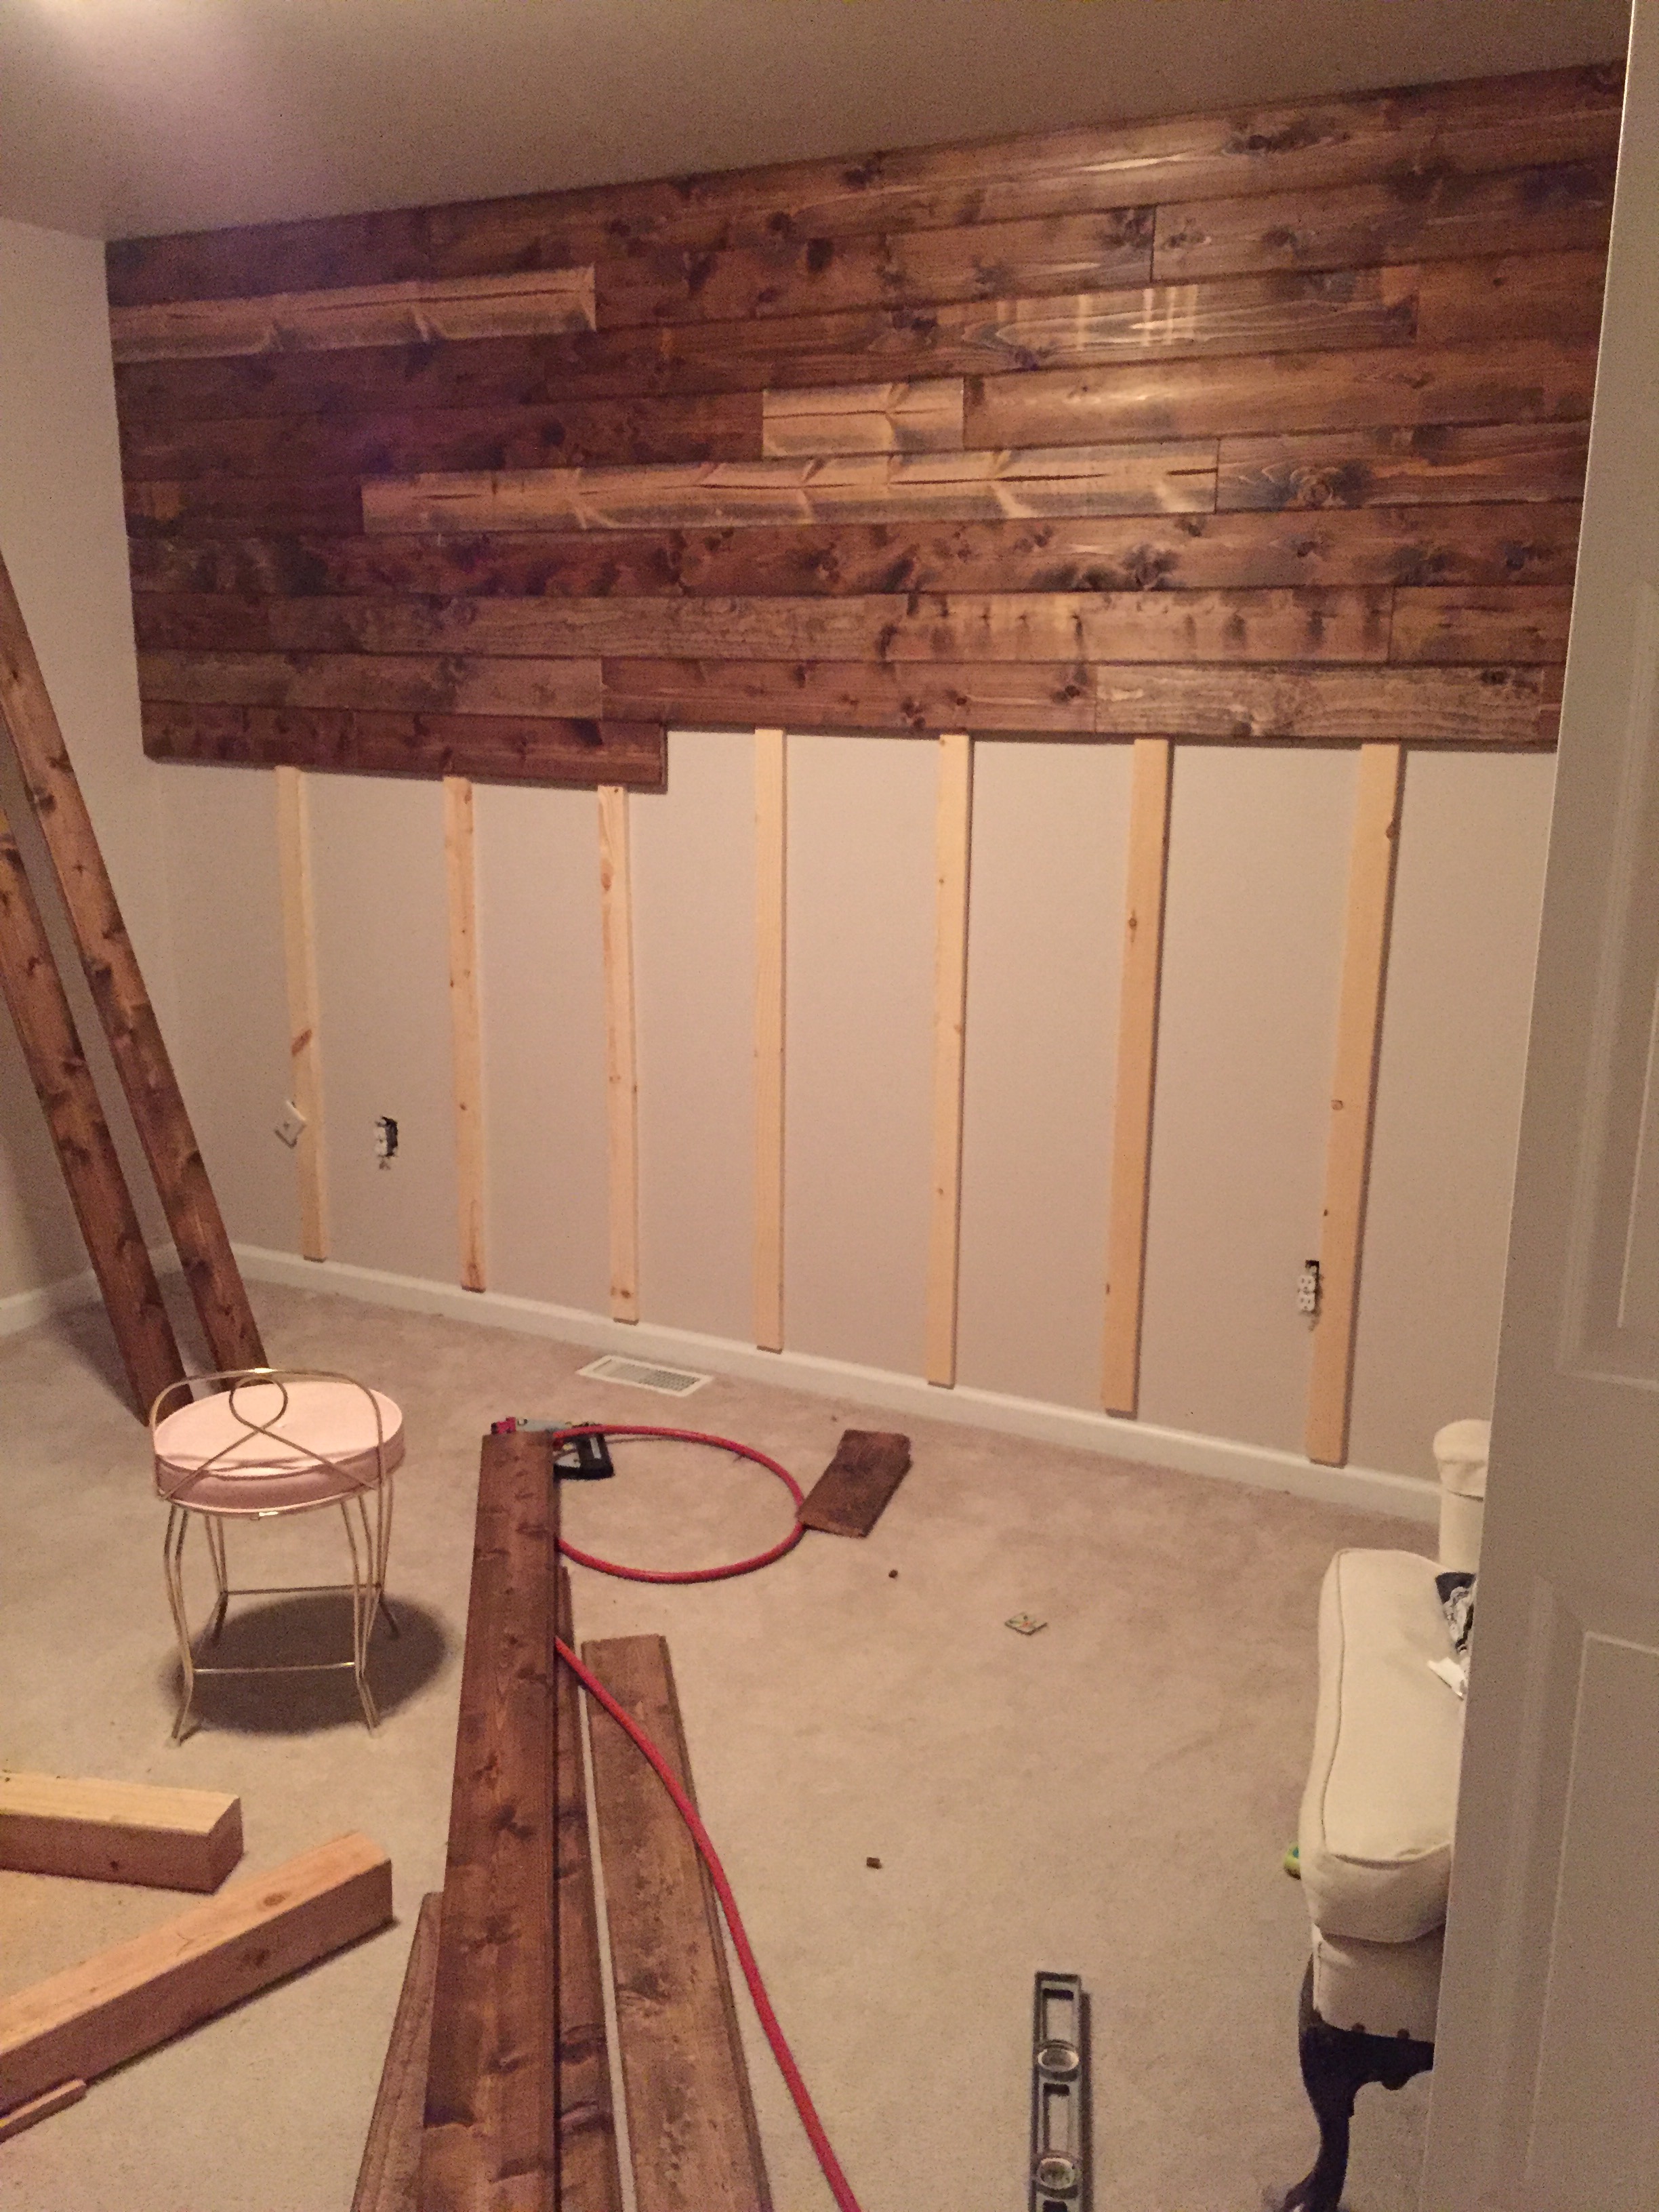
Going around the outlets seemed pretty tricky to me, but he just sat down and busted those babies out, being sure to cut the wood just right so that the outlet covers would conceal it properly.
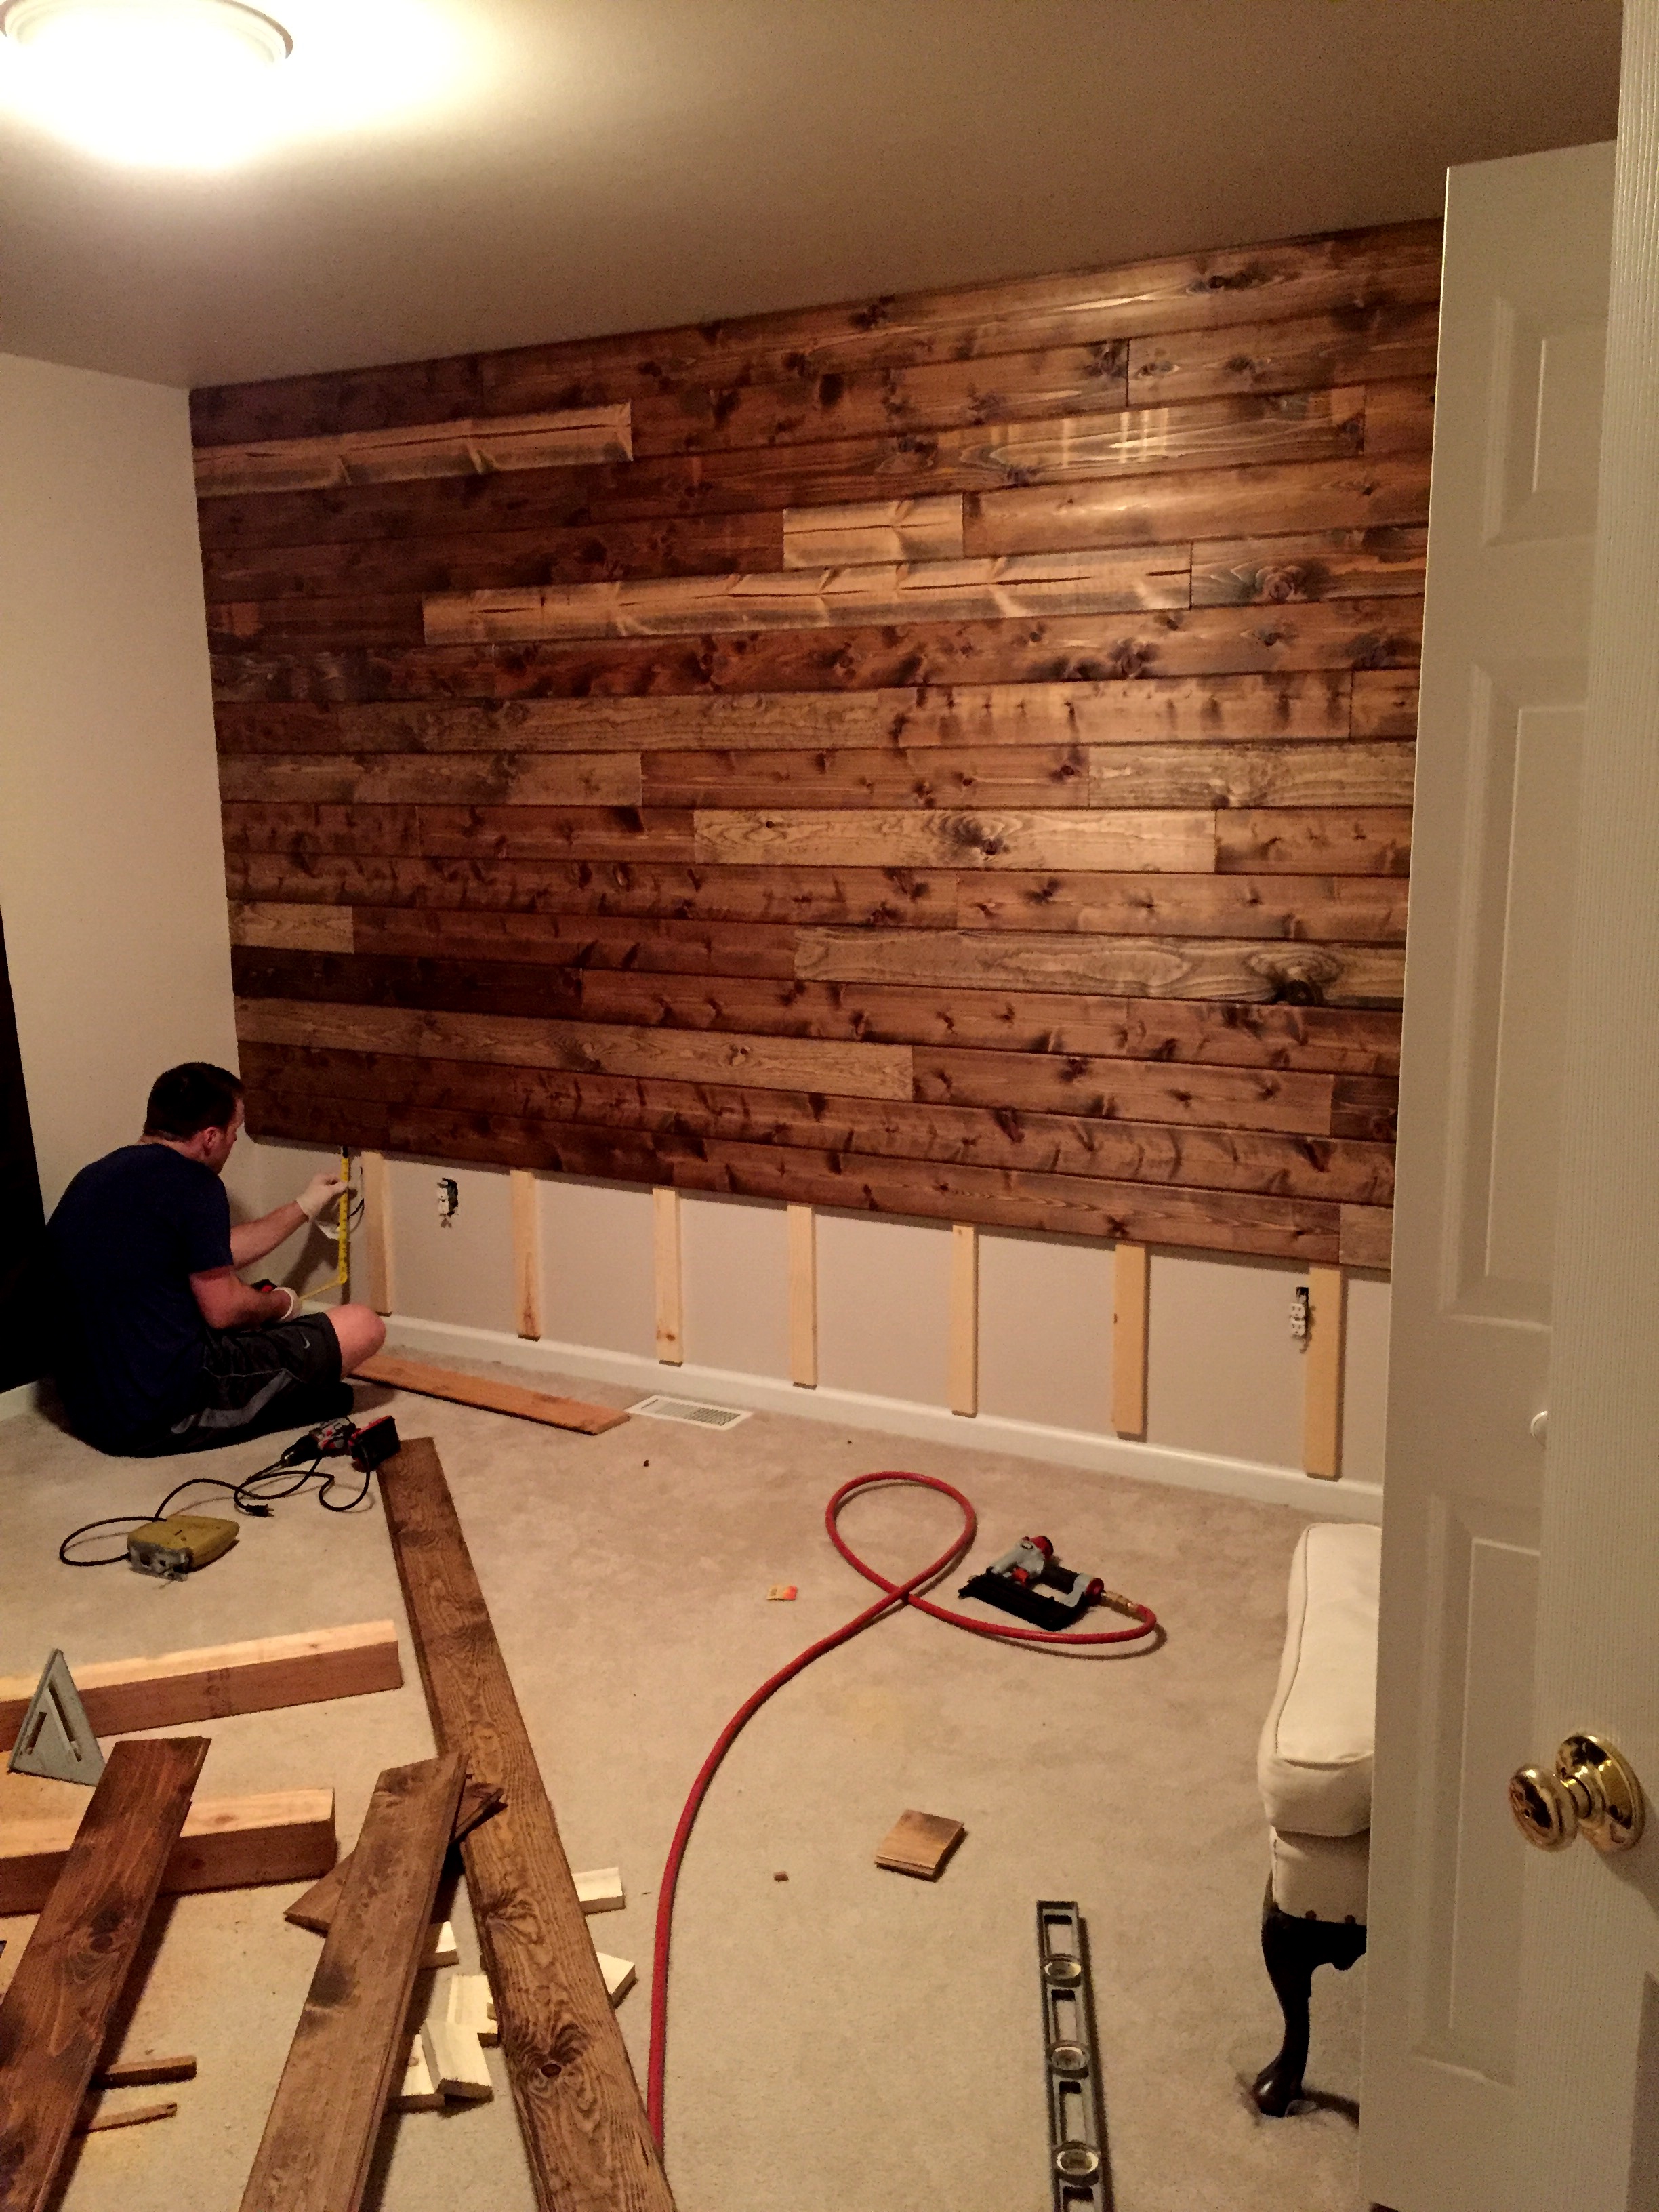
And in about half a day, this project was done from shopping to finish. And I am BEYOND thrilled with the outcome!
I just think he did such a good job in varying the wood color and placing the pieces just so. Franklin’s rustic woodland themed room is off to a great start!

Thanks for stopping by 🙂
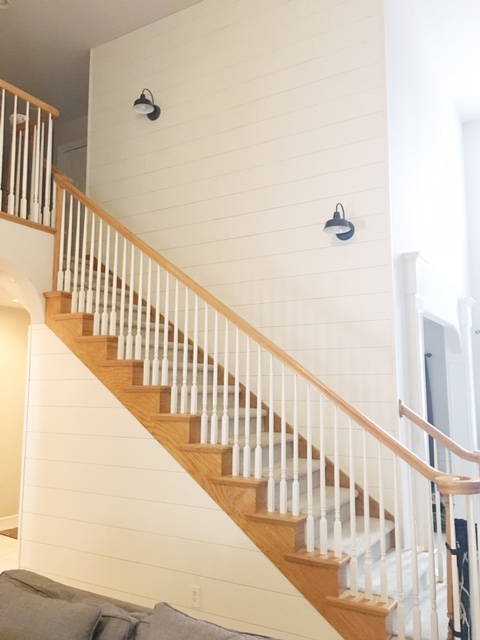
If you like this and are curious how this is different from the shiplap look, go HERE to see how we ship-lapped our stairs!


Looks so good!!!
Thank you so much!
I love this! It’s exactly what I want to do in our dining area. Thanks for sharing.
Oh you are so very welcome! Show me when you are done!
Do you have an approximate cost?
Shoot! We bought a bunch of other materials for another project at the same time.. so I am not sure! If I HAD to guess, I would say maybe around…. $250ish? My husband said it was cheaper than the flooring options he was looking into if that helps?
Hello and is it wood for flooring or is it different.?Wood
Did you use an oil or water based stain? Did you polyurethane over the stain?
Awesome, thank you for the step by step. Going to do this in my bedroom. Cant wait 🙂
I’m looking to do this for my son’s nursery… Do you know why you elected to use tongue & groove wood? Did you actually align each piece into the groove as you went along?
I appreciate your help!
We chose tongue and groove because it’s easy to align and put together! And yes, we put the boards together as they’re supposed to! 🙂
What are the demensions of this room?
I am not 100% certain, but I believe his room is close to 12×12, and the wall is 8×12 if that helps!
Curious what color paint you used on the other walls? Thanks!!
I would also like to know the color of the other walls,i am thinking about doing something like this also.i’m thinking shiplap but i like this to.just not sure what color to paint the walls.
Great job! Thank you for sharing a peek into your home!
How did you get the wood to line up with you’re white trim at the bottom? My husband is hesitant to start this project and says the wood would stand out much more than the trim and is worried about how things will look down there.
Hi Gale, The thickness of the wood that my husband chose is pretty thin and doesn’t stick out much, if any, from the trim at the bottom. If it does it is only slightly and I haven’t noticed! I would go check but my baby is sleeping in there right now.
we t9ok the trim off the wall and put it in front of the wood. we also found the most affordable way to do this with cedar was to buy the 6 foot individual fence pickets. just required a little extra sanding. gave lots of beauty tones with being cedar. the only issue we came across was the outlets seemed sunken in. so we ended up making cute little doors that opened for the outlets. we don’t use the outlets but wanted access to them if needed. we considered pulling them out of the wall and redoing them to be flush however if we were to take this down in the future it would be an extra project or a big eye soar.
They make extensions for the outlet box just for this purpose. You can find them at any hardware store. You can also find them on Amazon. Just remember to shut off the main breakers before installing the extension. There very easy to install.
The outlets were my concern and the rough cedar..so you sanded the cedar? No polyurethane coat needed? Also I would replace my outlets,with brown covers and trim out the outlets leaving them back flush to the wall..otherwise you would have to pull the box out more and we would have to get an electrician. Our problem us built in speakers on rhe wall
.not sure how to handle this.
.beautiful job
I love your idea of making little doors around the outlets. That is a very neat idea. Like little fairy doors.
Is this an apartment? Ifor so how did yall get it down?
No, it is a house- and I wrote up a tutorial if you’d like to see exactly how we did it! It’s on the blog. 🙂
looks very nice. Is there a reason you started at the top instead of the bottom. I was thinking of starting at the the bottom but put a ‘frame’ around the whole wall to hide end imperfections. Comments?
We started at the top as any imperfections would be more noticeable toward the top than at the bottom. My husband could also cut the wood to whatever size needed, width-wise, if it was too wide to fit once we got toward the bottom.
What did you do with the outlets??
Hello! My husband cut the wood to go around them. 🙂
Hi quick question did u guys have to relocate the wall switches. Since u are adding a 1×3 and the actual board?
We did not!
Great jobb im going to do this one day and have been looking at some diys , to the people asking about outlets you can buy outlet extention boxes at your hardware store . Also in one diy i seen someone cut a thin line down the back of each board to prevent future warping or bucklling ,mabie because he was using old wood im not sure but yess thank you for your post its very helpfull 🙂
This looks amazing! I want one in my bedroom!
This looks amazing! I’d love to have a wooden accent wall when I finally own a house.
Thank you so much!!
Wow this looks awesome!! I love the woodland theme… It’s SO cute, and perfect for all ages. I can’t wait to see how the rest of the room turns out.
Thank you so much!!!
Love the wall! It looks so cool and will be a great accent wall for years.
Thanks so much!
Did you use an oil or water based stain? Did you also finish the wood after the stain?
Did you use a wood conditioner before the stain?
It looks so great!
I did not, and thank you!!
Love this! Great Job. We plan on doing something like this in our Grand Baby’s room.. was worried about outlets and covers. Glad you mentioned them!
I am sure you will love it!!
Awesome we are planning on doing this idea this weekend for our daughters nursery. What brand of stain did u buy?
EEk! I don’t remember! I’m sorry!
We are doing the same thing and I was going to stain the boards but on a test board I did, the stain smelled really strong and I don’t want that smell in my bedroom. How long did the stain smell hang around our did you seal the boards?
I think the smell only lasted a couple of days? I don’t remember it being overpowering!
I love it!
It was fantastic.
Did you use nails to fix the wood?
Thanks
Which type of glue I can use please
Did you distress the boards before staining? I like the rustic look and am afraid of using new wood.
Thanks!
No, I didn’t! Just stained new 🙂
Were you able to hang things up easily?
Yes, just like hammering a nail into a normal piece of wood!
Used your tutorial and our wall turned out great! Thank you for your help and tips to get it done! Took us a little longer than you mentioned but we are very happy with the outcome!
Hooray!! So glad you liked it and it turned out well!
I just gave you a little shout-out on my blog.
staceking.com
thx!
thank you so much! I appreciate it immensely!
I love it, I am going to do this in my house.
Hello blogger, i must say you have very interesting posts here.
Your page can go viral. You need initial traffic boost only.
How to get it? Search for: Mertiso’s tips go viral
Amazing !
Loving your page !
Amazing Loving Your Page !
Congrats on your baby! Great tutorial! I read and watch so many and I appreciate how straight forward yours is! I have wanted to try this with pallet wood/ driftwood or anything reclaimed really, but you made me realize the challenges of thickness. I may just have to faux the floor planks.
Thank You!
Karen 🙂
Hi,
I am just wondering, are the nails not showing up? like are they visible?
Hermoso
Terrific! I love it.
Can you link the wood you used, please?
I have noticed you don’t monetize your website, don’t waste your traffic, you can earn extra
cash every month because you’ve got hi quality content. If you want
to know how to make extra $$$, search for: Mertiso’s tips best adsense alternative
PLannng I’m doing this project to nearly exactly these specs/directions. Do u know how much stain u ended up using as well as, how many coats went on?? Thx. Look awesome btw!
Hi there. Thanks a lot for your idea turning into reality and for sharing. How did u stick the wood pieces? With glue or with screws? I tryed to zoom in to see, but i don’t see any screws. Could you explain please? Thank you
I have checked your blog and i have found some duplicate content, that’s why
you don’t rank high in google, but there is a tool that can help you
to create 100% unique content, search for; Boorfe’s tips unlimited content
I have noticed you don’t monetize your page, don’t waste your traffic, you can earn additional cash every month because you’ve got hi quality content.
If you want to know how to make extra bucks, search for:
Ercannou’s essential tools best adsense alternative
Hi, is anybody here interested in online job? It’s simple survey
filling. Even 10$ per survey (ten minutes duration).
If you are interested, send me e-mail to hansorloski[at]gmail.com
Hey nice… I really like your blog. Very useful information. Thanks.
Great blog right here! Additionally your website quite a bit up fast!
What host are you the use of? Can I get your affiliate link to your host?
I wish my site loaded up as fast as yours lol
8what did you use for the 3×1 boards on the sheetrock wall
Can you clarify what you’re asking?
Hello, apologies if this has already been asked but I didn’t read all the previous comments.. We are attempting this for our daughters woodland themed nursery and I just wanted to ask did the wood shrink at all over time? As I’ve heard that when wood adjusts to the temperature in your home it may shrink.. Thanks in advance Lisa
Hello your wall looks great! My ex boyfriend did this to one of my living room walls with 1inch fence Pickett’s but I have some gabs in between some boards do you know what I can use to fill them? I would hate to take it down I’d have to plaster the whole wall to cover all the nail holes.
Any ideas greatly appreciated 🙂
Did you look for studs in the wall before using the nail gun? Did you use a construction adhesive on the back of the paneling? Also, what size nails were in the gun?
The furring strips are on studs, and no on the adhesive because we wanted to have the option to remove them. I think the nails were 2 inch 18 gauge brad nails
I hope that helps!
How we can put light i if we make it it our house
I would love to make one of this for my living room How much is the cost of everything if you don’t mind asking? Is amazing enjoy very much
I love this!!! Plan on doing in my massage room, but have a question. Which wood is the darker of the two? I really want the dark and not have the contrasting colors, just because of my personal preference.
gracias. Me ha quedado súper bien. Lo recomiendo.
Going for a modern , rustic them in loving room .. wonder if placing it on all three wall would be okay or just two or even one .. I would love to pick your brain lol.
This is just what I’m looking for! Question on the outlets, were they sunk in to the original wall or did your husband have to extend them out a bit to be flush with the wood wall, if so, how? Thanks for sharing!
I wish I could had a dream to do that. As ND it was all a ok or .and the jokes on me
Does the space between the two walls allow for any moisture that may create problems?
How much were the cost of all materials
Thanks
Muy buena idea para luego poner el televisor en esa pared ya que estoy en la construcción de una avitacion
Cutting the boards into thin slices is what was done in the 70s. That way you aren’t working with heavy boards. You won’t notice how thin your boards are, and it stretches the material so you need only buy a third to a half as many boards. The slices could beat quarter inch thin. Also the design could be, like a sun with it’s rays… not just floor board look. I’ve seen really beautiful work done. The different colors of wood were worked into the design.
Great looking wood accent wall. Can’t wait to do this in my cabin. Thanks for the information.
Did you use glue to hold nailer to the wall?
Great tutorial! This wooden accent wall adds so much character. If you’re looking for a flawless finish, consider a handyman service to get professional results. Thanks for sharing!