
This DIY project is one of my very favorites. A little outside-the-box. A little risky (that’s a lot of nail holes!). And, possibly time-consuming. But, I knew it would make a statement, so I went for it!
And friends, I cannot take any of the credit for creativity here, as I saw this idea from the insanely talented Ana of Fiddle Leaf Interiors, who first did this project of a gorgeous horse on her wall! As soon as I saw it, I fell in love and knew I had to try and recreate something similar in our home. So! If you, too, are wanting to try this project, go read her very detailed blog post first! Tons of great tips and very thorough!
I did a few things differently, so below is the tutorial for how I did it. I hope you enjoy!
Materials:
Softcover books (number will vary depending on image chosen)
Squirt bottle filled with water
Coffee
Paper towels
Tape (for the floor, to draw out the area when planning your book layout)
Projector (we put the image on an ipad and hooked it to the projector, so look into how you will get your image to the projector.)
Hot glue gun (I only needed one glue stick)
Paint brushes ( I used two small paint brushes, one for the fine lines when tracing, and one to fill in)
Directions:
First, I needed to choose a design, and this was the hardest part! It took me a little while to finally figure it out. I wanted something timless, that would go with the flow of our home, and that I thought I could easily trace, so it took me a while to find the right one. But, when I came across this photo, I knew it was a winner since it seemed to meet all the criteria! My friend, Taylor, is really good with graphics, and she then filled in a few parts for me so that it would be easier to trace and stand out more, and once that was done, it sealed the deal.

Next, I purchased my books at a thrift store down the road for 4/$.25. They were so cheap! I got them all for under $3!
I then laid down a bedsheet, followed by towels, on top of our dining table, and laid the books on top. I opened each book to a page that didn’t have any pictures on it, and toward the middle of the book, and creased it to stay open. Using an old spray bottle filled with water, I then sprayed each book so that the pages would crinkle. I mainly sprayed the top pages, and then went around the edges as well.

Next. I brewed a cup of coffee, dipped a paper towel in it and then rubbed the coffee over the tops and sides of the book pages. This helped to give the books an aged look, and since every book took the coffee differently, they all ended up different shades, which I was hoping for.
 I did this in the evening, and by morning they were all dry.

I then needed to decide on an arrangement, so I measured the wall space, and then taped off that space on my floor so I could play around with the books.

Being an indecisive person, this ended up being harder than I thought! But, with the help of my friend, Taylor, who was able to photoshop the image on top of my books, I was able to get a visual for how it would look, and decided on the layout below. (Or so I thought!)

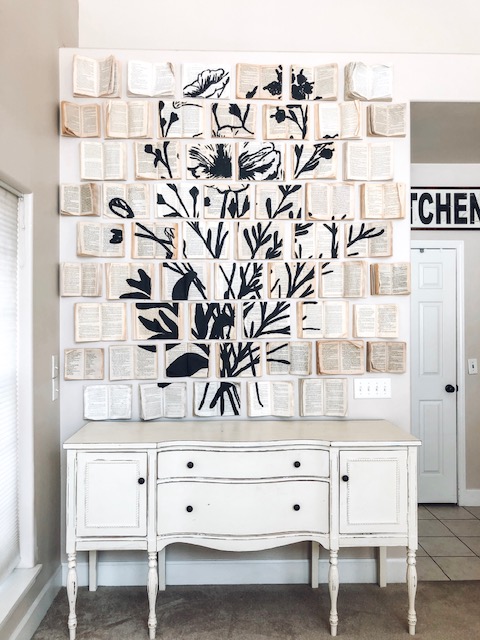
Randomly, I had a dream about the books covering the whole wall, so the next morning I rearranged them one last time and ultimately decided on a 6,7,6 arrangement. I had to leave a space for our light switches, which is why there is a space left open in the corner.

Next, my husband helped me project the image on the wall by using the projector we use for our television so that I had an easy picture to trace. Having the image on the wall before nailing the books in helped ensure there weren’t any weird gaps between the books, potentially distorting image.

Then, it was time to nail those babies in! My husband had the great idea to use a laser level so that each book was hung straightly, so with each row, we just moved the laser level up, giving me an easy guide in keeping the books in line. (Below, the book is not yet level. 🙂 )

I then took the nail gun and put two nails in each book. I put the nails a handful of pages back so the nail wouldn’t be seen, and nailed it about 1 inch from the binding of the book, on each side. (See below.)


As I started each new row, I placed the books for that row on top of the buffet, just as I had had them on the floor, so it made nailing them up go very quickly.


Some of the books flapped open more than others, and I liked that! But, to ensure the image was easily paintable, I did go back to the books that would have a lot of the image on them and I put an extra nail or two in them to flatten them out, and I also used little dots of hot glue to keep them flat. But for the books without much or any image on them, I kept them open more.


The books went up so quickly that I still had plenty of daylight, so I decided to start painting! The problem was that I didn’t even have the paint yet, so I took a quick jaunt down to Joanne’s to get paint and some paint brushes. During this time, the sun went down a little more, making the image darker on the books, as you can see below.

I decided to trace the image first, as that seemed to require the most concentration, so I wanted to get that part out of the way, and I am glad I did it this way. It made filling it all in go very quickly and was also mindless.

It took me an hour and fifteen minutes to trace it, and about an hour and a half (or a little less) to fill it all in. So, I started painting at 6:15, and was done by 9! Really, not too bad!

And at 9:00, when I finished and turned the projector off, I could not have been happier to see the end result. Such a satisfying project! I absolutely love it.

And the next morning, when I woke up and saw this?! I may have shed a little tear.

I hope these tips and tricks were helpful for you, and if you are debating trying this project at all, I highly encourage you to go for it! It really wasn’t bad at all, and turned out to be so satisfying! Again, a huge thank you to Ana of Fiddle Leaf Interiors for coming up with such an amazing DIY!
Do you think you would ever do something like this in your home?
As always, thank you for stopping by!
<3 Shannon


I enjoyed the details that went into this post. Also love the idea. I really wouldn’t mind doing this someday
I don’t think you would regret it!! Thank you so much!
This DIY wall art was so beautifully done and I appreciate all the details you put into penning down the entire process. Great read!
I appreciate that very much! Thank you!
That is just the coolest thing ever, especially because I’m a book lover! Do you think my school would have a fit if I did this in my office… 🙂
Hahaha NO! I say you GO FOR IT!!
This looks really cool!! You did a great job. How easy is it to clean? Does it get really dusty?
You know, I have no idea! It’s only been up for two days now! HA!
This is such an interesting idea and turned out just beautiful! I love the flower design!
It took me so long to decide on the design!! But, it needed to be just right, ya know?!
I have never seen this done before! So pretty and unique!
Thank you, Angela! I just love it so very much!
This is SOO amazing!! It turned out just beautiful! What a perfect spot for it as well, I’ve never seen anything like it!
-Madi xo | http://www.everydaywithmadirae.com
Wow I’ve never seen anything like this before, it is so beautiful and creative!
This is such an amazing project! Not sure if that is something that I would ever do but I love the concept. Using the coffee to stain the books reminded me of when I wrote an “old” love letter to a crush in high school lol. You did an awesome job!
Such a beautiful idea!
Kasey Ma
http://www.TheStyleWright.com
I NEED THIS!!! This is so stunning and original, ill be stopping by value village to pick some books up!
This is so cute and creative! I love the look of the books!
So creative and unique. Loved the idea!!
xo ~ Sheree
OMG this is seriously so cool and such a fun, unique idea! I’ve never seen anything like it! xo, Brittany Nicole | http://www.theblistblog.com
I love this so much. I am going to try it this summer! Did you tear the covers off the books? Thanks so much!
This is so awesome and such a cute idea! Now I need an empty wall!!
Very nice idea and well done! 100% Handmade!
Absolutely Beautiful and very unique. Thank you for sharing
That is so cool
I love it– so creative!
As a librarian I love creating art with books. What you have done is beautiful. I would love to create something just as lovely. I’m so intrigued by this and hope to create something as interesting as yours. Thanks so much for sharing your work.
Great process post! This looks amazing!!!