On a whim, my husband decided to rebuild our deck.
Actually, I am going to go ahead and say WE rebuilt our deck, because trust me, I’ve made more runs to Home Depot and other various lumbar stores in the past month than I had previously ever done in my lifetime, not to mention being the one to drive long distances for special lumbar, helping hold said lumbar and retrieve tools when more hands were needed, ensuring plenty of cold beverages and food were always available, and being the sole parent while my amazing husband worked 14 hour days building this thing. So yes, teamwork!
We had previously talked about what we ultimately wanted our back deck to look like and I showed him what my thoughts and visions were, but I didn’t think it was going to happen so soon. He just, started.
He was sitting at our kitchen table drawing plans and doing research one day, and the next day at about 5:00 pm he started ripping down boards. I couldn’t believe it. And our back deck is on the second floor, so this project had to be finished right away once started being there was a big drop-off out the back door.
So, here are the before photos:
The stairs took up about half the space…

To the left, I had a little herb garden, and to the left of the herb garden were just some wild flowers and a mint plant, but nothing very appealing. At all…


View from inside the house.

There was really only room for our BBQ, two chairs and a side table.

Tear down:


And then the process of re-building began:


And for three weeks our backyard was a workshop.


Every little detail was checked over and over and re-done if not perfect, and slowly and surely it started to take shape.

My husband woke up before anyone else on most days to begin working, and one of my babe’s favorite things to do was watch his daddy working while eating breakfast.

Measuring was a favorite, too.


Before the posts were added, we realized just how hot it is out on the deck during the middle of the day and concluded that even once it is finished, no one is going to want to be out there due to the heat. So, we decided to add a pergola, which set us back a bit and we had to re-think some of our original designs. But, we came up with something that we both liked and kept going.
Once the floor boards were put into place, it really started taking shape!

My husband and I really like the look of the thick, chunky posts and wanted to use 6×6 posts instead of the traditional 4×4’s, but finding 6×6 posts at the height we needed was nearly impossible without special ordering, so my husband decided to wrap 4×4 posts to make them into 6×6 posts. Doing this alone took three entire days as it was a very tedious job. Thankfully, my step-dad flew into town to help my husband with this part and it was a HUGE help! Once those were done, the rest went up pretty quickly!


And the scrap pieces of wood made for some amazing building blocks.

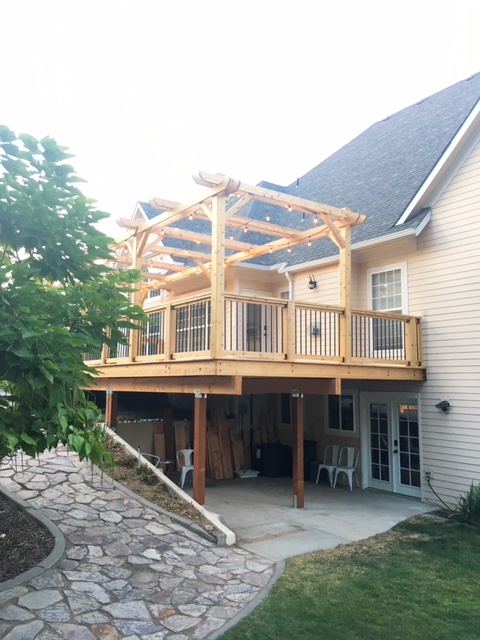
And now, the after photos!
We re-located the stairs to the other end so that we could utilize that space, and it made a HUGE difference. We are also now able to enjoy the space under the deck as well.


And my herb garden and weed patch are no more, and I am completely okay with that!


My husband didn’t quite get it at first, but I insisted on finding a spot for a little swing. It isn’t meant for swinging high on, but more as another chair for sitting/swaying on, and I truly love it.

We decided on black bars for the railing, and I love the contrast they give.

Just SO much more space!

Our BBQ is going on the far left corner where it was before, and I had noticed that people like to stand around my husband to talk while he cooks, so I asked my husband to alter the railing next to the BBQ into a little bar for people to set their drinks and food on and we will add stools underneath so people can sit comfortably while chatting.

We need to wait a few more weeks before staining, and then it will be completely done! We are going with a very natural look and hope to find a stain that looks very similar to the color of the wood, maybe even clear if there is such a thing.

Overall, I absolutely LOVE the finished product and can’t wait to show you how I decorated this space! I am almost done and will be sharing next week. 🙂


I am so incredibly thankful for the time, energy and effort my husband put into this deck. He worked relentlessly on this project to ensure we had a nice outdoor space to enjoy and I am still blown away by the outcome!
And a HUGE thank you to our friends Dustin and Johnnie for helping my husband when they could and for my step-dad for flying out as well! We appreciate you all very much!
Thanks for stopping by!


It looks AMAZING, you guys did a great job!
Thank you SO much!!
What a beautiful space! I love that you added so much functional area. I’m preparing to have our deck redone in October…except we are not handy enough to do it ourselves. That must feel great to know you guys accomplished that!
THANK YOU! We got a quote and it was just WAY beyond what we had ever expected! I had no idea decks could be THAT pricey!
I love how this turned out! It’s gorgeous!
Thank you so very much!
This came out great. It looks so nice!
Thank you, Kate! I appreciate it!
Wow! This is such a HUGE improvement! I’m so impressed. I hope your family enjoys lots of time outdoors in your new space.
Thank you! We are thoroughly enjoying it!
This looks amazing! I cannot believe you did all of this. I know how frustrating DIY projects can be and how many trips to Home Depot it includes. It looks great! I hope y’all really enjoy it as a family.
Countless trips to Home Depot! HAHAHA! I so appreciate the kind words!
Oh wow, this came together really well! I love the swing. 🙂
Thank you! I do, too 🙂
That is an amazing improvement. Outdoor space is so wonderful. I am sure your decorations are going to be stellar as is your whole inside of your house. I have to ask, did you do something different with your windows in the after pictures as well? It looks like in the before they are covered by a screen or something.
Oh you are SO SWEET! Thank you! And yes! I didn’t even notice that before! Our sun shades are drawn in the first one because it was so hot in the house! It helps cool it down faster!
what? DIY? this is so impressive and so gorgeous!!!
Hahah yes! And thank you! I am in love!
WOW! Just, wow! I am so impressed with how much extra room you made by moving the stairs. The whole thing looks so incredible! Well done!
Thank you so much! It just made SO much more sense to move those dang stairs! Now I don’t have a heart-attack every time my babe wants to go down the stairs!
What a project! We need to redo our deck soon, so thanks for the inspiration! I like the look of the black bars.
They are such a classic look! Thank yoU!
You guys did such an amazing job!
Thank you sooo much!!
This is beautiful! Very motivating to get outside and get ours fixed!
It looks amazing, he did a wonderful job. This was so fun to read, I’m glad you took so many pictures! Now I want to build a deck, lol!
I enjoyed seeing this transformation! The new stair placement is genius. What is the approximate size of the new deck?
I am about to update my deck and I love this size. What are the measurements? Thank you so much!