Last winter my mom was visiting and while out running errands one day I decided in about thirty seconds that I wanted to paint our kitchen table. It happened that fast.
So, I called a friend and asked where to buy Annie Sloan paint, plugged in the address and with my mom and kids in tow we picked up all the supplies I would need to get the job done. I did make a phone call to The Hubby to make sure he was okay with it, and he was.

Let me just say that before this, the only thing I had ever painted were school projects and other small items with spray paint. Amateur hour over here.
But, we got home, put the kids down for a nap and lugged everything into the garage.
![IMG_8523[1]](https://i0.wp.com/livingwithlady.com/wp-content/uploads/2013/11/IMG_85231-225x300.jpg?resize=225%2C300)
A few years ago I was painting my nails and left the nail polish remover-soaked paper towel on the table, leaving this nice little stain. It bothered me ever since, so I was glad this was all going down.
![IMG_8520[1]](https://i0.wp.com/livingwithlady.com/wp-content/uploads/2013/11/IMG_85201.jpg)
I asked my pal, who has done quite a bit of painting in her day for some tips and my mom and I went to town. The SUPER nice thing about Annie Sloan Chalk Paint is that you do NOT need to sand anything and you do NOT need to use primer. I have never done or used any of those before, but the thought just sounds tedious. You literally just start painting.
Each piece needed two coats and it actually took a looooooong time. Those chairs are tedious to paint getting all around every little angle. But, we did it with super cold hands (it was November) and did I mention I love my mama?

After that I went over it with a clear coat of Minwax water-based polycrylic. I picked the brains of the people at Ace Hardware and they said for high traffic pieces of furniture, such as a kitchen table, this is best.

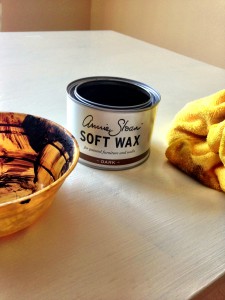
I wanted the table to look worn, not stark white, so I then used Annie Sloan’s Dark Wax. You just dip your rag into the wax, rub it on, and then rub it right off. The wax will stay in the little crevices giving it that antiqued look.

My daughter thinks it looks dirty, but what does she know?

When The Hubby came home I was nervous to find out what he thought, but was pleasantly surprised when he genuinely seemed happy with the results!

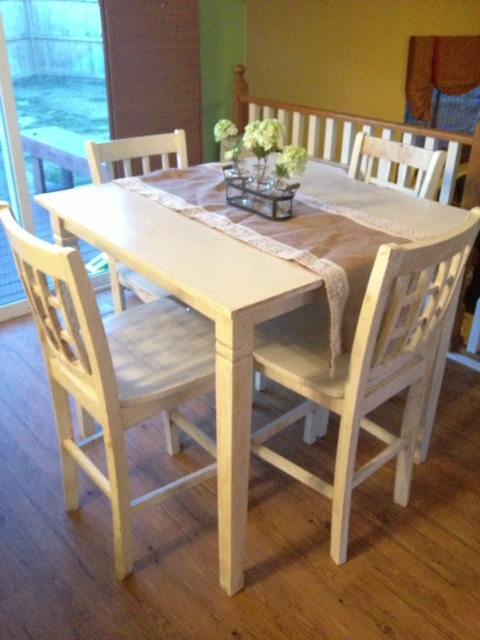
So, here is the final product! I apologize for the poor lighting. I took this picture right as it was getting dark, but you get the gist!
What do you think?
Thanks for stopping by!


I love it!. It looks great Shannon!!!! I hubby and I have been quite the re-finishers these days. Mike refinished Sadies’s crib and dresser/ changer combo, which a good friend gave us for free. I then refinished a 3 chest dresser and mirror for her room. Total cost on furniture + mirror for Sadie’s room…. dun dun dun…. $10 + paint supplies 🙂 Score!!!
Thanks so much, Meagan! I am really happy with how it turned out. That is so awesome you and Mike have been doing all of that refinishing! It feels so good to see the finished product and love what you see. And you definitely scored!!!!!
Love it! Looks so current. I have used Annie Sloan in the past, but there is even more durable paint out (no sanding or priming) called Farmhouse Paint. You omit the waxing in the end, less work. To finish off, just use high grit sand paper to get a nice polish.
Oh that is so good to know, Pia! So wait, you use sand paper at the very end?!?! I just can’t imagine this!