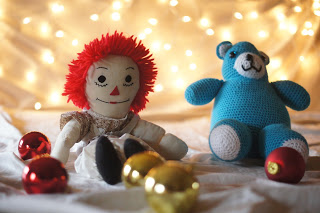
You know when you see a picture on Pinterest and it’s always kind of in the back of your mind? Hmmm, yeah, that is what happened to me as I was searching for Christmas picture ideas a while back and I just couldn’t put that one photo out of my mind.
So I just kind of kept my eye out and slowly started gathering what I would need to make it happen, and before I knew it everything just fell into place. We hadn’t put up our Christmas lights yet so I happened to have the icicle lights ready to go…. I stopped into a thrift store and found a bag of red and gold ornaments for $1.89, the exact ones I was looking for…The sheets already on our bed would work perfectly…Yes…. yes I was pretty sure it could work without too much effort!
The one area that I did spend some time with is my camera. I have a Sony a55 that I received for Christmas last year and I haven’t spent very much time “getting to know” it. I usually use the “Auto” option with a 50 mm lens and I am able to capture those great, crisp photos with the blurred background with ease. Buuuuuut, the lighting was just a little too dark in my room so I needed to do some research.
After scouring the internet and learning that the effect I was after (blurred lights in the background) is called “Bokeh,” watching a few Youtube videos and making two separate phone calls to the store where my camera was purchased (Huppins in Spokane, GREAT service, btw) I felt (semi) confident that I could make it happen.
To hide the headboard I draped our cream-colored bed sheet over it and then strung the icicle lights across, draping one behind the headboard toward the middle so that the strand wouldn’t droop too much. I ruffled up the fitted sheet so that it wasn’t too tight and had a softer feel, placed the ornaments sporadically on the bed (they will not stay where you originally intend with REAL children, so don’t spend too much time here) and then used two “prop children” to take a few practice photos.
This picture was taken with the “auto” option on my camera and you can see how it is just too dark. I also just wanted to show you what the setup looked like from a distance.
After playing with a few settings on my camera I was happy with the results. I also had to take the autofocus off, for when I would try to photograph two subjects, it would only focus on one or would try to focus right in-between the two objects. Took me a while to figure that one out!
Photographing one object was SO easy though! (Especially a non-moving subject.) Look how nice that turned out?
I am going to save my results for our Christmas card, and may just share them closer to Christmas… okay who am I kidding, I WILL share them closer to Christmas. But for now, here is a sneak peak at a photo of Cal I did while practicing and waiting for Gwyn to get done with Preschool.
I LOVE how they turned out!
Don’t forget to enter the GIVEAWAY going on right now for a free custom crocheted hat from The Hewlett Hive! Today is the last day! You don’t want to miss out as they are irresistible!


Only registered users can comment.