


This is the pack of paper used.

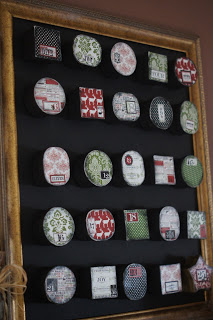
Here is my thrift store frame with the boxes placed on top to ensure that they would fit.


We painted the star gold…

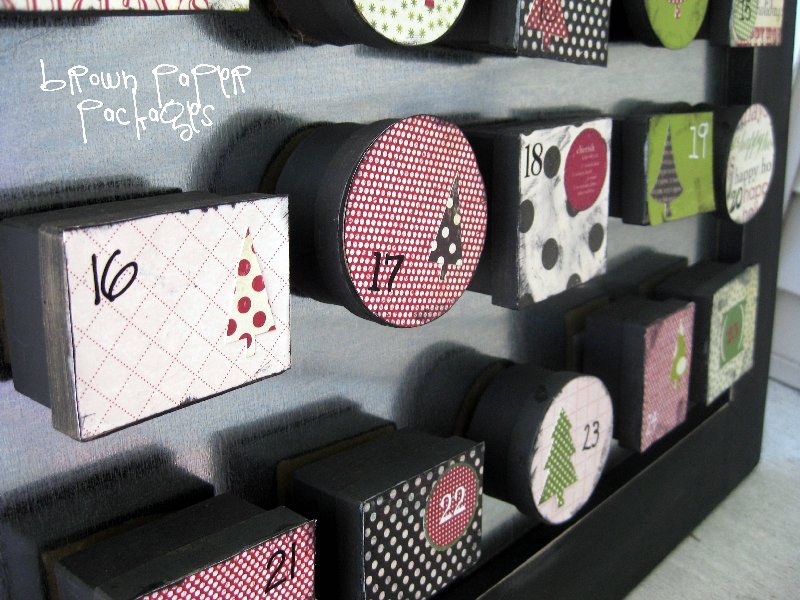
Then, we mod-podged the paper to the lids of the boxes: First, spread a thin coat of mod podge using a foam brush over the lid, and then place your lid flat side down on the back of your desired paper. Then, cut around the lid with your utility knife/box cutter so that the paper is now attached to your lid.


The pack of paper came with two sheets of the paper below, which were perfect for the numbers on top of the boxes. We carefully cut those out and then used a glue stick to glue them to the tops.

Then, we rubbed Distress Ink around the edges of the boxes with a paper towel to give them a vintage feel.

Next we painted a final coat of Mod Podge over the tops of the boxes to seal it all in.


BUT, I do recommend it! Here’s why. Instead of having to store this large advent calendar when Christmas is over, you can just store the boxes and then use the frame as a chalkboard for your home! Genius, right!?


Lastly, we made “fillers” for our calendars using green and red card stock and added stickers we thought the kids would enjoy.


I am so excited to place each “treat” inside the box and to do these activities with my family to make for an extra-special and fun Christmas!

Here is what my advent calendar is filled with, in no particular order…
Make and decorate Christmas cookies
Christmas lights boat cruise (A Christmas lights show in Coeur d’ alene taken place on a lake)
Open Christmas ornament
Drive around and look at neighborhood Christmas lights
Visit Santa Clause
Go get a Christmas tree and decorate
Watch a Christmas movie with special treats
Write a letter to Santa
Read a new Christmas story
Open Christmas Eve present (new jammies!)
Make a Christmas craft
Decorate a gingerbread house
Read the Christmas story in the Bible
Drink hot cocoa with marshmallows
Bring treats to the firemen and policemen
Visit a live nativity scene
Adopt a Christmas child
Open Christmas CD and dance to music
Make Christmas pancakes
Go see the train lights (in Lewiston)
Then the last few say “Special treat!” and I will fill with a Christmas goody. I’d like to find those gold chocolate coins. I just loved those as a child!
I also made a couple of blank cards that can be filled in last minute in case one day we can’t do a planned activity.
Okay, now I’d like to save you some time and tell you where we messed up…
We thought we could save some time and a little cash if we used magnetic paint and painted the glass that came with the frames. In theory, this wasn’t a bad idea. But, you will need fairly big/strong magnets for the boxes to stay on the board if you go this route. The magnets we bought would not stay on the board, even after four coats of paint. We even added three magnets to one box to see if it would hold, and while it would, the board was weaker in certain areas and it just wasn’t reliable. We also tried magnetic tape, and that also would not hold the boxes to the board. So a fair amount of time was wasted gluing on and plucking off magnets. This is when we gave in and bought the sheet metal, which was only about $12/sheet and our original magnets worked perfectly.
I hope you enjoy!!!


You could totally sell those, beautiful!!!
Girl!!! THIS IS AWESOME! I love it so much! It looks great! Its been pinned and I’m tweeting about it now! 😉 Thanks so much for linking up!
Ahhh thank you!!! I am SO happy with how it turned out!!! Thanks for the tweet!
Love it!! Love all your fun ideas too 🙂 I’m curious about those Christmas Pancakes!?
Our Family is doing Random Acts of Kindness during this month. Check it out if you want 🙂 We have a few fun ideas on our list too!
http://allmylovemommy.blogspot.ca/2012/12/dont-be-grinch.html
Oh the Christmas pancakes are DELISH! Red Velvet! Your whole family will love them!
I will definitely check out your list, too!