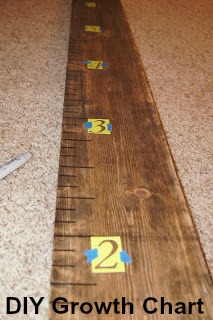
I then used a tape measure and marked every inch up the left side of the board using a pencil. I made the lines 1″ long. (Make sure your measuring device is accurate! I was initially using a ruler that wasn’t completely accurate and it resulted in a lot of erasing!)
This is a very important step! If you don’t want your board starting from the floor (think about baseboards) then you will want to account for that empty space. I decided to hang my board 6″ off the ground, so I began marking my board at 6″ from the bottom of the board, making the total height 6′ 6″ once hung.
Using a black sharpie, I then went over the 1″ lines, and also extended every third line to be 2″ long to make it look more like a ruler. I also extended every line that marked a foot to 2.5″ long.
I then taped my stencils on the board next to the appropriate lines. NOTE: This is where I ultimately messed up. I wanted my board to look as much like a ruler as possible, and it wasn’t until I was finished that I realized that I taped my numbers on wrong. Instead, they should be taped perpendicular to the board.

I then used my sharpie and colored in the numbers.
Here is my newly stained board. .
And the finished product. We hung this board 6″ off the ground so that the total height would reach 6’6″.
Hope my trial and errors save you some time!
I still have the first attempt and have decided to give it away if anyone would like it! It is still fully functional and looks quite nice, so if you’d like to be the owner, or would like to give it to someone as a gift, then…
1.) You must live in or near my town, as I’m not willing to ship this baby!
2.) You can also live in the Carson/Reno area, as I will be visiting in June and can bring it with me.
3.) You must subscribe to my blog. 🙂
4.) You must leave a comment on this blog post telling me one of your favorite summer activities/memories as a child, or something you enjoy doing with your own kiddos. I’m looking for ideas here!
A winner will be chosen at random and notified within a week!
Good luck!


Okay so something fun we do with our kids in the spring/summer, is bike rides. We found a great baby trailer to put on the back of my bike, we load it up with lunch and go to the park. As a family unit we spend alot of time at the Truckee river or on the beaches of Lake Tahoe making sand castles. Micheala my 7 year old made her first sand castle at 3. (it looked like a big lump) But she was sooo proud of it. Trips to the beach with little ones give a new meaning to “Sand”which. Plus watching babies play in the sand and water is just fun! I hope that gives you something to think about. :0)
Christina, We would LOVE to do bike rides with our kiddos. The town we live in is pretty hilly, but there is a great bike path we could try out. And I can’t wait to take them to the ocean this summer! Thank you so much for the suggestions!
Shannon!
Okay so I think I subscribed to your blog. Not exactly sure!
Anyways, As a teacher I would love to have this in my classroom!
Measurement is a huge part of standards in all grades. My students would just love this GIANT ruler so use during math time.
My favorite summer activities are anything that has to do with being in the water (i.e. boating, lake tahoe, the beach, and especially floating the river!)
I don’t have any of my own kids but I do have 35 students and I enjoy going outside and planning lessons that can actively engage them. My goal would be to eventually have my own blog where I post lessons and pictures of student work so that parents can be involved and I can always go back to my years in teaching and look at old work.
Something really fun I did with the girls I nannied for and Gwen might to young for this, but we made a summer to do list and we made it a goal to check off everything on the list. We came up with ideas like….
1. Make a music video
2. Build a sand castle
3. Go to sea world
4. Tie Die
5. Make picture frames
6. Go to ceramic cafe (its this cool pottery store where you can paint coffee mugs
and plates)
7. Make popsicles
8. Paint the first letters of our name to put in our rooms
Thats just an idea of things we did but you can create your own and its fun to have everyone come up with an idea and then you all have something to look forward too.
My cousin (who is a teacher) does these things with her 4 kids on her summers off. She creates really fun and cheap art projects. Here is her website:
http://californiaparkers.blogspot.com/
Hope this helps!
Cari
Cari,
I love the idea of you starting a teacher blog! YOu have GOT to do this,the parents will LOVE it!And thank you so much for all of the great outdoor ideas! There are definitely some on there that Gwyn will love. And I will check out your cousin’s blog too, thanks!