
Since our little baby will be sleeping in our bedroom until ready for his/her own room, I wanted to put some curtains up in there to help block the light while sleeping. That, and our bedroom is pretty neutral and I wanted to add a little “something.”
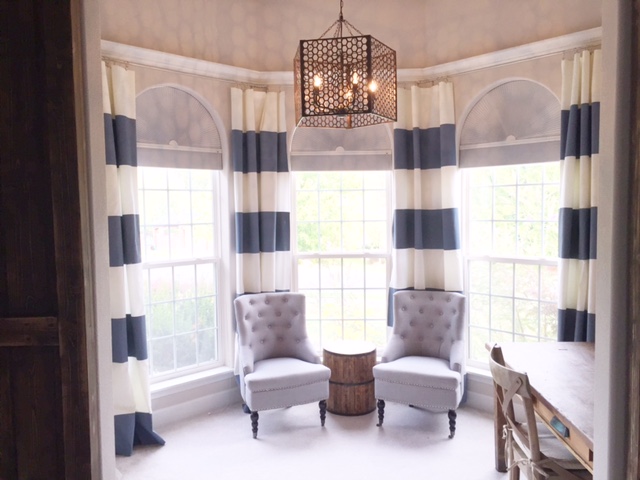
After searching the internet for quite a while, I finally found “The Ones.”

Gorgeous, right?
The problem was, I couldn’t find them in the length I needed for a decent price. In fact, it took me a ton of searching to find them, period. But once I found them at $210 PER panel, I fainted before deciding I just couldn’t swing that, so I turned to trying to make similar ones myself.
Not being able to find the fabric, I then decided my last option was to paint them.
I know what you’re thinking. Because I thought the exact same thing. PAINT curtains?!
And believe me, on my quest to gather materials I was questioned the WHOLE way by many different people.
But, some tutorials from Pinterest were telling me that I could do it and that it works, so I had some hope.
After browsing around for a while, I deemed THIS site my go-to for directions. I pretty much followed these directions step-by-step, while making a few tweaks along the way that worked better for me.
So again, go HERE for the step-by-step directions, and see below for my alterations.
I needed curtains 104″ in length, which just aren’t available. White curtains 108″ in length don’t come by inexpensively that often either, so I had to make my own. But, if you want to do this with curtains that come more widely available, I suggest buying them pre-made!
After talking with a few different people at JoAnn Fabrics, I chose a fabric that was in the long roll section. One that was thick enough to hopefully hold up the paint, but not too thick to where they wouldn’t bunch properly. I needed approximately 13 yards and was able to use a 40% off coupon on all of it, coming to about $65 total.
I also ended up getting my paint from Wal-mart! I looked at a few places but Wal-mart had the color I was going for. I chose Mountain Slate Blue and got a gallon for about $20. I’d say I have about 1/2-1/3 of it left, too.

Materials:
Pre-made curtains or fabric made into curtains in a medium thickness
Paint in color of choice (I made four 104″ panels and had about 1/2-1/3 of a gallon left)
Paint roller and rolling sponges
Paint tray
Painting tape (I used the green color block kind)
Tape measure/ruler
Tarp or something to paint on.
Duct tape (optional)
Directions:
I started out by making my curtains, and since I am not a huge fan of the sewing machine, I used witch stitch on my seams which worked really well.
I then duct taped the tarp down to my garage floor so it wouldn’t move when walked on.

I then put two panels on the tarp and started measuring my lines. For 104″ curtains, I wanted each section to be 13″ . And I started out measuring just like the tutorial suggested. It wasn’t until I was almost done that The Hubby suggested a much faster, easier way IF you have two people. Instead of painstakingly measuring every few inches up each line ensuring it’s straight, I made a tiny mark every 13″ down each long side of my fabric. Then, with The hubby on one side, and me on the other, we each held one end of a long strip of the painters tape and lined it up on the marked lines straight across from one another, pulling tight and then putting it down at the same time giving us a nice straight line. SO much easier!

Once the fabric was taped, I began rolling the paint on. The fabric soaked up the paint pretty well, so it took a lot to ensure no white spots. (Refer to tutorial for when to remove tape and how much paint to apply.)


The paint did seep through on my curtains, so after it was dry on top, I flipped them over to dry the backside on a clean area.
And that was it! I was so pleasantly surprised how well these turned out! ESPECIALLY since I made all four panels for under $100!

And once hung with the light shining through, I could see some spots that needed some touch-up.

And this little guy is my worst little mess-up. But for the most part, nice clean lines were created.


What do you think?
Thanks for stopping by!


I can’t believe how well these turned out! Paint!? WOW!
YES! Just regular wall paint! 🙂
I am in LOVE! I want to do this asap! Good job, girl!
Thanks so much!!!
Love it!
Ok Shannon, This is a great hack for something that would have cost you 8 times as much!! 😲 They look fantastic and you’ve inspired me to give it a try!